Tag Archives: 2.5

Generate Transmittals

A Transmittal can be generated for a single expected document in your Work Area by selecting “Generate Transmittal” from the Actions Menu associated with that document. Transmittals can be created for multiple Expected Documents in your Work Area by selecting “Generate Transmittals” from the Actions Menu for the Work Area page.

If there are more than 50 items in your Work Area you will be alerted that the operation can only be performed on a maximum of 50 items at a time. Clicking Ok will allow you to proceed with the first 50 items selected.

This will display the Generate Transmittals window. Any items that already have content will not be included in the list. Deselect any documents that you do not wish to generate a transmittal for before clicking Generate Transmittals.

This will start a document download that includes a Transmittal page for each selected expected document.

Delegate Task

If you have the ability to delegate a task to another user, a “Delegate” option is available in the Actions menu for the task within the Inbox. To delegate the task, select the “Delegate” option.

In the Delegate screen, select a Recipient to receive the task from a list of qualified users. Once a recipient has been selected, click Save. The task will appear in the new recipient’s inbox and will be removed from your inbox.

You can also delegate multiple tasks at once to another user using the “Delegate All” option. Click here for more information.

Advanced Search

Disambiguation

There are many different ways to search in the eTMF. For help with each of the following, click the link to go

This search function is also called “Advanced Search”. An example Advanced Search is shown below.

Advanced Search Overview

This Help Topic is focused on the eTMF Search Function reached by clicking the “More” gear in the Top Bar, then “Search…”

Example Advanced Search screen

Who Can Use Advanced Search

Default eTMF security configuration allows access to Advanced Search and the ability to save searches for users in the following roles:

  • Assist
  • Business Administrator
  • Contributor
  • Document Specialist
  • Indexer
  • QC
  • Reader
  • Senior Management
  • Study Owner

When is Advanced Search Helpful

Advanced Search is most helpful when you need to search across multiple studies, since there is no way to search across multiple studies in the study item list search or other searches.

Advanced Search can also be helpful if you need to search across multiple sites within a study.

When NOT to use Advanced Search

Avoid using Advanced Search when looking for a set of study items in a single study or a single site. In those cases, the study item list search is simpler to use, faster to work with and provides the same result set as Advanced Search, but in a more useful format.

Building an Advanced Search

Advanced Search criteria are built in three steps:

  1. Scope
  2. Metadata
  3. Options

Each step is described in detail below.

Scope

First, click “Define your search scope…” in the scope field to open the scope selector.

Then, use the drop-down buttons for ProgramsStudies, Countries and Sites to add values for the areas in the eTMF that you want included in your search results.

Remember: You can only set the scope of Advanced Search to those areas of the eTMF where you have access rights.

Scope settings are all multi-select, so you can keep adding values to expand the scope of your search. Use the “x” at the right edge of a value to remove it from the search scope.

Metadata criteria

Once the scope is set, you begin to define the combination of fields and values that you would like included in your search results with the following steps:

  1. Choose the attribute to search on from the first drop-down list.
  2. Choose the operator from the second drop-down list.
  3. Provide the values you want to include in your search results.

Note: eTMF Advanced Search is NOT case sensitive for text attribute values, so “study” will match “study” and “Study”

Conjunctions

To search on more than one attribute, choose:

and” if you want your result set to include only study items that meet all criteria

or” if you want your result set to include all study items that meet any one criterion

Note: Only one conjunction is available for a search. Mixing “and” conjunctions with “or” conjunctions is not supported.

Show Empty Study Items

Check the “Show Empty Study Items” if you want to see unfulfilled study items in your search results. Leave this option unchecked if you only want to see finalized study items in your search results.

Show Expired Versions

Check the “Show Expired Versions” if you want to see expired study items in your search results. Leave this option unchecked if you only want to see unexpired study items in your search results.

Click the “Search” button to execute a search with the current settings and display the matching study items in the bottom panel.

Working with Search Results

The study items that match your search criteria are shown in the lower panel.

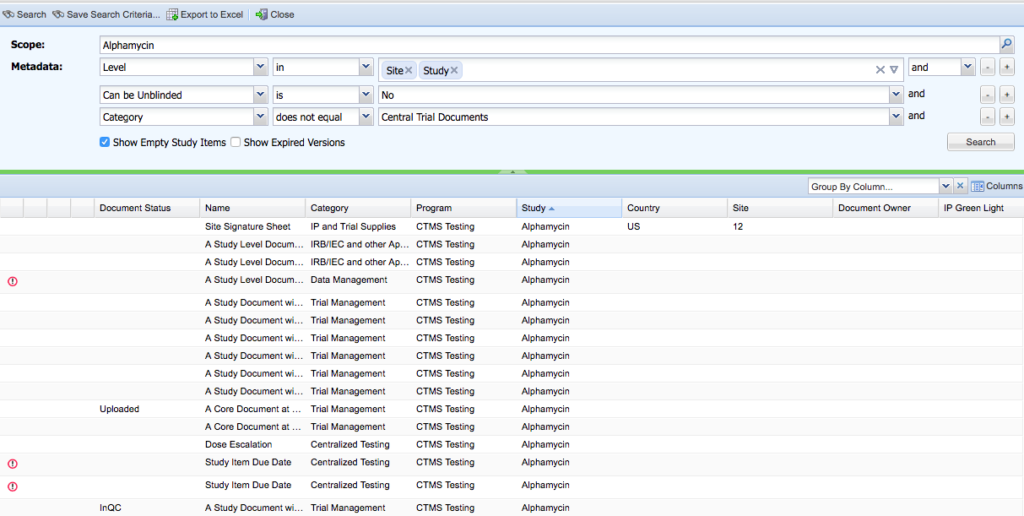
Advanced Search results

Filtering, Sorting and Grouping in the Grid

Select a column from the “Group by Column” drop-down box to group the search results by that attribute.

Add columns to be shown in the results grid by selecting the “Columns” drop down at the far right.

Click on a column header to sort by that column. Click again to reverse the search order.

Click the drop-down menu for a column heading and use the “Filter” option to apply a filter to the search result set.

Exporting to Excel

Click the “Export to Excel” button in the top menu to download an Excel file with the details of the result set. You will see an informational message: “Export has begun. Exporting now. This may take several minutes”

The exported Excel file will be saved by your browser to your default download location.

Saving a Search

To Save an Advanced Search for future use, click Save Search Criteria above the search criteria fields. The Save Search window will be displayed where a Name and Description can be given to the Search Criteria.

Note: Saved search criteria include the Scope, Metadata and Options you set in your search, but not the grouping, sorts and additional column filters you apply to the result set after the search has run.

Once a Search Criteria is saved it can be accessed by selecting the More Actions menu in the Top Bar, then clicking Saved Searches.

Sharing Saved Searches

Who Can Share Saved Search Criteria

eTMF users must be in the “TMF Share Saved Search” group to share saved searches.

Note: Users do not need to be in the “TMF Share Saved Search” group to have saved searches shared with them.

Note: Search results only include study items that the user running the search has access to. Because different users have access to different sets of study items, the same saved search can return different results when run by different users.

How to Share Saved Search Criteria

To share an existing Saved Search, reach the “TMF Saved Search Editor” by clicking  the “More” gear in the top bar, then Saved Searches… and right-click on the search and Edit.
Select the user to share this search with from the drop-down box for Share Search With.

Advanced Search for Documents vs Study Items

Search results are always study items, except if you include “Document Status” as a metadata field in your search criteria, then all of your search results will be documents.
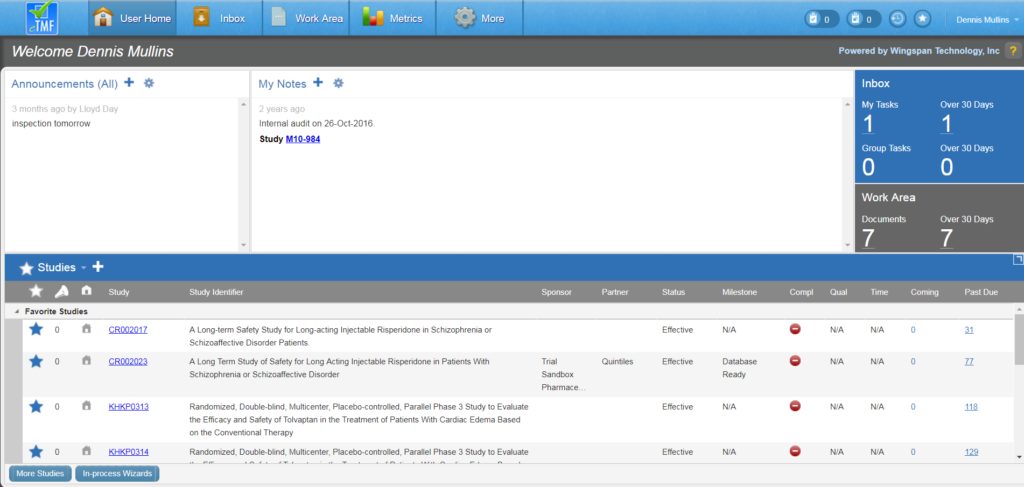
Make Obsolete and Revise All Items

The eTMF allows a Study Owner to make the current version of study items that were activated with incorrect metadata/content or that are no longer needed obsolete while at the same time assigning rework tasks for those study items. Study items can be made obsolete individually or in bulk.

To make all items in a list obsolete and revise them, access the list view’s Actions menu and select “Make Obsolete and Revise All Items. ” If your list contains more than 50 items, a message is displayed, stating that the action will be performed on the first 50 items. You will need to repeat the action on additional items. Click OK to continue.

On the Make Obsolete and Retire All Items screen, enter the name of a Recipient who will receive rework tasks for the selected items. Once a recipient is entered, the list of study items is updated to display only those that can be revised by the recipient. The system also updates the list to include only those that can be made obsolete (e.g., those that are not program or enterprise documents, those that are Final, etc).

Select a Reason and enter any Comments you might have. Then deselect the check box for any study items you do not want to make obsolete and click Obsolete and Revise Selected. The document status will be updated to Obsolete, QC.

Create Reference Model Browser Item

You can add new reference model browser items to categorize, organize, and display documents related to the standard TMF Reference Model organization.

Prerequisites: You must have TMF Manage Tmf Browser permissions to add a new Reference Model Browser Item.

  1. On the User Home Page, select More within the Global Header. From the Actions menu, select “View eTMF Configurations.”
  2. Select the Breadcrumb. From the Actions menu, select “Reference Model Browser Configurations.” The Reference Model Browser Configurations List Page is displayed.
  3. Select the gear icon above the list. From the Actions menu, select “Create New Reference Model Browser Item.” The Create Reference Model Browser Item screen is displayed.
  4. In the Artifact Number field, enter the reference model ID.
  5. In the Unique ID Number field, enter the Unique ID Number of the artifact from the TMF Reference Model. This field is used by the TMF Exchange Mechanism export (i.e., only items with a corresponding Unique ID number will be exported).
  6. In the Zone Name field, enter a new zone or select an existing zone from the drop-down list.
  7. In the Section Name field, enter a section name, or select an existing section from the drop-down list. The sections displayed are those that are relevant to the zone selected in the previous step.
  8. In the Artifact Name field, enter the name to be used for the folder in the Reference Model Browser folder structure.
  9. Select “Create.”

The item is added to the Reference Model Browser Configurations List Page. In addition, a folder that corresponds to the newly created ID will display under the specified zone and section folders in the Reference Model Browser folder structure.

Note: The folder displays only if study items exist in the study for the newly created ID.

You can also add a Reference Model Browser Item when adding a new Master List Item.

Reference Model Browser Configuration

The Reference Model Browser Configurations List Page* allows you to manage the TMF Reference Model folder structure for viewing documents in a TMF.

*Note: Only users with TMF Manage Tmf Browser permissions to have access to this page.

The page displays records for each of the standard TMF Reference Model IDs used for your Document Types, as well as records for other custom IDs you’ve created. Each record corresponds to an artifact folder in the TMF Reference Model folder structure (shown below).

Any custom reference model IDs that exist in your system are added to the list of types with Undefined Zones, Sections and Artifact Types.

You can edit the records on the Reference Model Browser Configurations List Page to change the organization of the artifact folder (for example, to display the artifact folder under a different zone and section) or to change the name of the folder. You can also create new reference model IDs and corresponding artifact folders from this page and export the list to an Excel file.

Acquire Tasks

You can acquire a task that is assigned to your work group. The act of acquiring reassigns the task to yourself and enables you to work on the task. You automatically acquire a group task when you open it; however, you can also acquire a group task by selecting “Acquire” from the task’s Actions menu.

If you have View Group Tasks permissions, you have the ability to acquire all tasks in the Inbox. This function is useful for acquiring tasks in bulk. You can simply access the Inbox, apply filters to display the desired set of tasks, and select “Acquire All Tasks” from the list’s Actions menu.

Acquire All Tasks menu option

If the number of tasks is above 50, a message will be displayed, stating that the action will be performed on the first 50 tasks. Click Ok to proceed with the first 50 tasks. The system determines which of the tasks can be acquired based on the following rules:

  • You cannot acquire a task that is already assigned to you
  • You cannot acquire a task if it was already acquired by someone else at the time you attempted to acquire it

The tasks that can be acquired are then listed on the Acquire All Tasks screen.

Acquire Tasks dialog

Deselect any tasks you do not want to acquire and click Acquire Selected Tasks.

To acquire a single task, use the “Acquire” option within the task’s Actions menu.

User Home

User Home Functions

Expand Lower Panel

The eTMF User Home Page gives you the option to expand the lower panel so that you can control how much of the display is allocated to showing Announcements, Notes and links to the Inbox and Work Area. The expand process works as shown below.

Toggle Lower Panel Between Studies and Sites

If you prefer to see Sites on the Lower Panel of your Home Page instead of Studies, you can change the display as shown below.

Use the star to the left of the “Studies” and “Sites” label to select which view to show as the default for your User Home. The bright star indicates your default view preference.

Links to More Detailed Help

  • Top Bar – Instant access to main system functions
  • Announcements – eTMF-wide and study-specific messages
  • My Notes – Your personal notes and reminders
  • Inbox – List of workflow tasks awaiting action
  • Work Area – Streamlined processing center
  • Studies – List of Studies you’re working with
  • Sites – List of Sites you’re working with
  • More Studies – View Studies other than your recent studies.

Quality Dashboard

The Quality Dashboard displays detailed information on the amount of rework required during QC within various interactive charts and tables.

When accessed from the User Home Page, the dashboard displays information for a single study; when accessed from the Metrics area of eTMF, the dashboard displays information for all studies. You can filter the dashboard to display only the information you need by using the facets that appear in the Filters Panel on the left.

You can collapse the Filters Panel (and expand the display of charts and tables) by selecting the left-facing arrow at the top of the panel. In addition, you can collapse any of the dashboard areas by selecting the down arrow next to the area’s title.

Use the icon at the top right of the page to export the dashboard information to an Excel file. You can access the Excel File from the Downloads area of eTMF. Note that if there are more than 32,000 results to export, only summary information from the charts will be included in the export file; report details will not be included.

Analysis

The Analysis area allows you to view the total number of documents QC’s, total number that failed QC, and a breakdown of those that failed. The data can be grouped using the selections in the Analysis dropdown (for example, by rework reason).  If you select a grouping from the table, the dashboard filters to show only relevant data for that grouping.

Failure Analysis

The Failure Analysis area shows the main categories and subcategories of failure reasons. Hover over a pie segment to see what it represents, and select a pie segment to view the reasons for each failure type (e.g., Document Completeness, Indexing, Scanning Accuracy).

Top 5

In the Top 5 area, you can view the five most used failure reasons for the selected data set or the five most failed Document Types. For example, you might want to apply a Document Type filter and then view the reasons most commonly used when failing that Document Type.

Selecting a reason or Document Type adds the value to the set of filters applied.

Document Quality

The Document Quality area displays the current quality compared to the portfolio average (i.e., combined quality metric for all studies you have access to). You can see how many documents have been reworked and can also view the percentage of those documents that needed to be reworked more than once.

Historical Quality

The Historical Quality area displays a bar chart that allows you to view the percentage of documents that passed QC the first time for each month within the past year. Hover over each month to view the percentage.

Completeness Dashboard

The Completeness Dashboard displays detailed information on whether or not required documents have been received within various interactive charts and tables.

When accessed from the User Home Page, the dashboard displays information for a single study; when accessed from the Metrics area of eTMF, the dashboard displays information for all studies. You can filter the dashboard to display only the information you need by using the values that appear in the Narrow Choices Panel on the left.

You can collapse the Narrow Choices Panel (and expand the display of charts and tables) by selecting the left-facing arrow at the top of the panel. In addition, you can collapse any of the dashboard areas by selecting the down arrow next to the area’s title.

Use the icon at the top right of the page to export the dashboard information to an Excel file. You can access the Excel File from the Downloads area of eTMF. Note that if there are more than 32,000 results to export, only summary information from the charts will be included in the export file; report details will not be included.

Completeness Status

The Completeness Status area of the dashboard displays a pie chart which breaks down the percentage of Unfulfilled, Fulfilled, and Pending documents relative to the total number of documents to be received. If you hover over a section of the chart, a tool tip displays the number of documents with the status and the percentage of total it represents.

Analysis

The Analysis area allows you to view the total number of documents to be received and a breakdown of the total by status (Unfulfilled, fulfilled, and pending). The data can be grouped using the selections in the Analysis drop-down.  This example above shows grouping by country. If you select a country from the table in the example above, the dashboard filters to show only relevant data for that country.

If the Dashboard is filtered to only one study, you may select the “TMF View” button to view the Study Item List.

Completeness

The Completeness area of the dashboard contains a bar chart that shows the current completeness percentage (# of fulfilled study items with a due date before the current date/# of study items with a due date before the current date) compared to the portfolio average (i.e., the combined completeness metric for all studies you have access to).  The total count of missing documents is also displayed in this section, allowing you to easily see how many documents are needed to be 100% complete.

Historical Completeness

The Historical Completeness area allows you to view a graphical representation of the percentage of documents completed for each month within the past year. Hover over each month to view the percentage.

image_pdf