In a File Review, a workflow task is created for each Action Item. The workflow task must be resolved before the Action Item can be closed. The user assigned to the workflow task can access the task from their Inbox.
Types of workflow tasks that can be created for Action Items include:
| Type of Task | Reasons for Creation |
| Rework | • Metadata Issues
• Content Issues
• Metadata and Content Issues
• Missing version of a finalized Study Item
|
| Upload Document | • Missing Document for empty Study Item |
| Delete or Mark Study Item as Fulfilled | • Document not needed or not available |
| Obsolete or Delete Document | • Document should not be in TMF |
| Correct Study Item Incorrectly Marked as Fulfilled | • Study Item marked as fulfilled needs to be corrected |
| Add Study Item | • Missing Study Item |
| Generic | • Generic Issue |
Like other types of tasks in eTMF, Action Item workflow tasks provide a set of options that the task owner can select for task resolution. For example, the task owner of a Rework task can select the “Submit-Send to QC” option if they have corrected the issue or the “Reject” option if no correction is necessary. All options available are described in the corresponding task type topic.
Users other than the task owner with the appropriate permissions can acquire workflow tasks if needed or can delegate tasks to other users (e.g., if the task owner is on vacation). Acquire and Delegate options are available in the task’s Actions Menu or can be found in the details view for the task.
The following table lists outcomes available when handling an Action Item workflow task.
| Option |
Tasks Option is Available for… |
When and How to Use |
What Happens |
| Ask |
|
You are not sure how to proceed and you need to ask a question.
Select a reason code, enter a comment, and select “Send Request.” |
- Task appears in QC group Inbox.
- Action Item status remains Open.
- Task status remains Active.
|
| Delegate |
|
You determine that you are not the right person to handle the task.
Enter the name or email of the correct person and select “Delegate.” |
- Task appears in new recipient’s Inbox.
- Action Item status remains Open.
- Task status remains Active.
|
| Delete
*Available only if the Study Item is not a Core Study Item and the user has TMF Virtual Delete Permissions |
- Delete or Mark Study Item as Fulfilled
- Obsolete or Delete Document
|
You have been instructed to delete the Study Item.
Select “Delete.” |
- Study Item remains visible only to administrators.
- Review Item changes to a Non-Document Review Item.
- Action Item status changes to Addressed.
- Task status changes to Completed.
|
| Mark as Fulfilled |
- Delete or Mark Study Item as Fulfilled
|
You have been instructed to mark the study item as fulfilled without content.
Select the reason the document cannot be obtained, enter a comment, and (optionally) specify the URL where the document can be accessed. Then select “Mark Fulfilled.” |
- Action Item is available to Review Manager for approval.
- Action item status changes to Addressed.
- Task status changes to Completed.
|
| Mark as Unfulfilled |
- Correct Study Item Incorrectly Marked as Fulfilled
|
You have been advised that an empty Study Item was marked as fulfilled in error and instructed to correct.
Select the reason the document cannot be obtained, enter a comment, and specify the URL where the document can be accessed. Then select “Mark Fulfilled.” |
- Action Item is available to the Review Manager for approval.
- Study Item status changes to Unfulfilled, and the Finalization Date is removed.
- Action Item status changes to Addressed.
- Task status changes to Completed.
|
| Obsolete and Retire |
- Obsolete or Delete Document
|
You have been informed that the Study Item is no longer valid and instructed to obsolete the item.
Select a reason code, enter a comment, and select “Make Obsolete and Retire.” |
- Action Item is available to Review Manager for approval.
- Document status changes to Obsolete.
- Action Item status changes to Addressed.
- Task status changes to Completed.
|
| Reject |
|
You do not think a correction is necessary.
Enter an explanatory comment and select “Action will not be taken”. |
- Action Item is available to Review Manager for approval.
- Action Item status changes to Addressed.
- Task status changes to Completed.
|
| Resolve |
|
For a Generic task, this indicates that you have taken corrective action outside of the task. Enter a comment and select “Action Completed.”
For an Add Study Item task, this indicates that you have added the new Study Item outside of the task (or will do so within the task) and want to mark the task as complete.
- To add the Study Item within the task, select “Add Study Item” and follow the prompts for selecting a document type.
- To mark the task as complete, enter a comment and select “Action Completed.”
|
- Action Item is available to the Review Manager for approval.
- For an Add Study Item task, a new Study Item is created.
- Action Item status changes to Addressed.
- Task status changes to Completed.
|
| Submit |
|
You have corrected the issue (e.g., metadata) or uploaded the necessary document.
Enter a comment and select “QC.” |
- Task appears in QC group Inbox.
- Action Item status remains Open.
- Task status remains Active.
|
Review Participants for a File Review are responsible for evaluating Review Items by performing specific checks. The checks to perform will vary by the type of Review Item. Some examples are listed below:
- Fulfilled Document – Ensure document is assigned to the correct Study Item and that the content and metadata comply with quality standards.
- Empty Study Item – Ensure document is still needed and not yet available for upload
- Non – Document Review Item – Perform checks based on definition of Review Item (e.g., Check for Required Periodic Updates to Documents
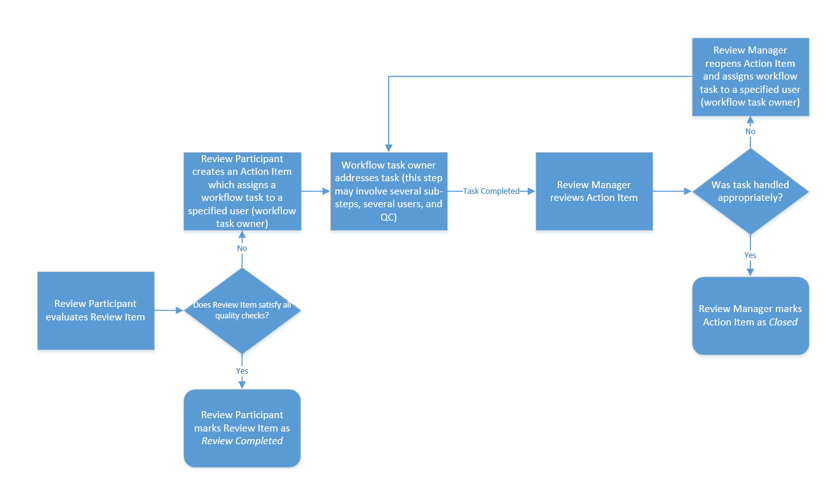
If all checks pass for a Review Item, the Review Participant can complete the Review Item. Otherwise, the Review Participant must create one or more Action Items and assign to specific individuals for resolution.

To evaluate a Review Item, follow the steps below.
Prerequisites: To evaluate a Review Item, you must have have VIEW_FILE_REVIEWS permission and you must be a member of a Review Participant Group for the template on which the File Review was based.
- Navigate to the Study Item List of the study for the File Review.
- From the Study Items Breadcrumb Menu, select “File Reviews.” The File Reviews List Page is displayed.
- Select the hyperlink for the File Review you want to work with. The File Review Items List Page is displayed.
- In the Filters Panel, select the “Not Reviewed” facet within the Review Item Status category to display only the items that need to be reviewed.
- Select the View Details link on the top right of the page. The first Review Item opens, and the remaining Review Items are listed in order within the panel on the left.
- Perform the necessary checks on the Review Item as instructed by your organization, based on the Review Item type (e.g., empty Study Item, Study Item fulfilled with a reason).
- Select one of the following options at the bottom of the panel to the right:
- Review Completed, No Action Items – Use this option if the Review Item passes all quality checks and no further action is needed. The status of the Review Item changes to Review Completed.
- Create Action Item –Use this option to create a workflow task if the Review Item does not pass all quality checks. See the Action Items topic for more information.
- Select the next Review Item from the list and repeat the steps above.
An Action Item needs to be created when a Review Item fails review checks and corrective action must be taken. An Action Item is associated with a workflow task and assigned to a specific user, who can access the workflow task from their Inbox. The user assigned to the task does not need to have access to the File Review itself.
An Action Item needs to be created when a Review Item fails review checks and corrective action must be taken. An Action Item is associated with a workflow task and assigned to a specific user, who can access the workflow task from their Inbox.
To create an Action Item while evaluating a Review Item:
- Select “Create Action Item.” The Create Action Item screen is displayed.
- In the Reason field, select from a list of Problem Types applicable to the Review Item type. Problem Types are provided from the File Review Problem Types dictionary.
- In the Recipient field, select the user to whom the Action Item will be assigned or enter the user’s name or email in the available field. The recipients are limited based on the selected Reason.
- In the Issue Category field, select the specific issue with the review. Issue Categories are provided from the File Review Issue Category dictionary and are limited based on the selected Reason.
- In the Action Item Comment field, enter an explanation or instructions.
- Select “Save.”
Multiple Action Items can be created for a single Review Item in parallel to track separate issues if the review items is an empty study item, non document review item, or study item that has been marked as fulfilled. Each action item created will be assigned and available to the designated recipient immediately. For document-related review items, only one action item can be created at one time. To create an additional action item, the first action item must be in “Addressed” status.
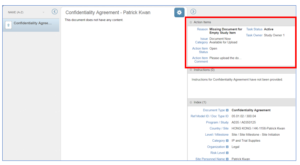
Action Items associated with a Review Item are displayed in the Action Items tab of the document details when the Review Item is accessed from File Review Items List Page. Action Items are not displayed for an item when it is accessed from the Study Item List Page.

Action Item panel
When an Action Item is created, it is assigned a status of Open. The status changes to Addressed once the recipient has handled the issue and selected an outcome that resolves it. Once the Action Item has a status of Addressed, the Review Manager* must review the Action Item to ensure that it was handled correctly. The Action Item can either be closed (which changes the status of the Action Item to Closed) or reopened with additional instruction.
When all Action Items associated with a Review Item are closed, the status of the Review Item changes to Review Completed.
Note: Review Participants may also be able to close and reopen action items based on a configuration in your environment (v 2.9).
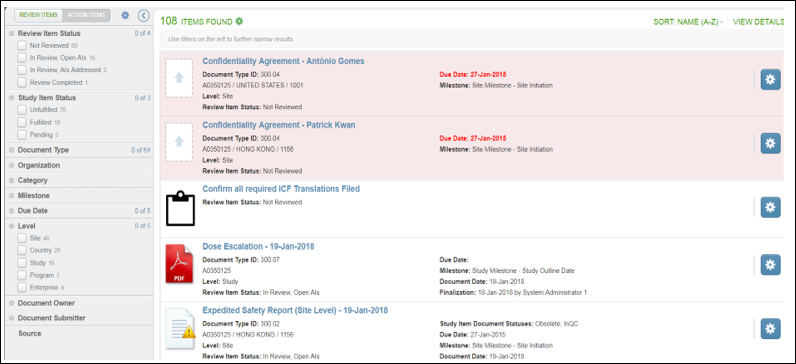
A File Review contains a set of Review Items to be evaluated as part of a secondary review process. Review Items are displayed on the File Review Items List Page.

The File Review Items List Page displays items in the same manner as the Study Items List Page. For example, you can tell which items are overdue or about to come due by their background color, and you can tell which items have been fulfilled by their icons. If the File Review contains any Non Document Review Items (i.e., Review Items not related to a specific document), those items are represented by a clipboard icon.
The metadata for each Review Item includes both document metadata and File Review related metadata. For example, you can see the Review Item Status in the metadata. Either type of metadata can be used to filter the list of Review Items.
From the File Review Items List Page, Review Participants can evaluate Review Items individually on a self-serve basis (Review Items are not assigned to specific individuals). In addition, Review Managers can maintain the File Review from the File Review Items List Page by adding or removing Review Items, deleting the review if necessary, or closing the review. All users with access to the page can view the File Review Dashboard or export a File Review Report.
Note: Review Managers, Participants, and Readers are determined by the template on which the File Review is based.
File Reviews are created within a study to initiate secondary review processes, such as a sponsor reviews or pre-inspection reviews.
File Reviews are created within the File Reviews List Page of a study. Users with at least TMF View File Reviews permissions can access the File Reviews List Page by navigating to the Study Item List and then selecting “File Reviews” from the Study Items Breadcrumb Menu.

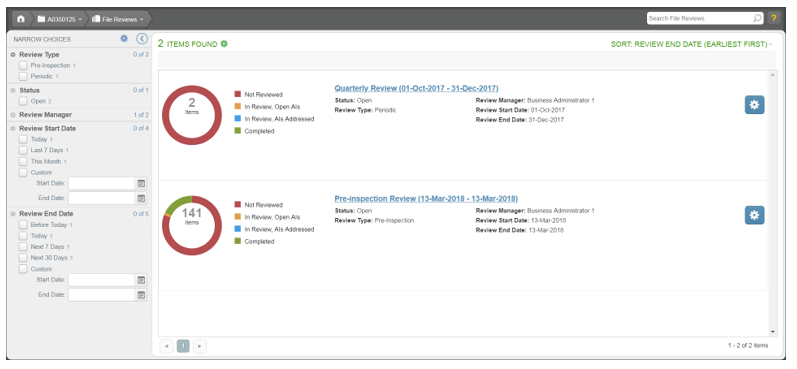
The File Reviews List Page displays all File Reviews for which the user is either a Review Manager, Review Participant, or Review Reader.
Note: Review Managers, Review Participants and Review Readers are determined by specifications for the template on which the File Review is based.
Each File Review in the File Reviews List Page is automatically named using the File Review description (if applicable), template, and start and end dates. These values are specified during File Review creation. The name is a hyperlink that takes you to the list of Review Items.
Under the File Review name, the status (Open or Closed), Review Type, Review Manager, and Review Start and End Dates are displayed. To the left of this information is a doughnut chart that conveys the progress of the File Review based on the status of its Review Items. The number if the middle of the chart represents the total number of Review Items.
From the File Reviews List Page, Review Managers, Participants, and Readers can view File Review progress, access the File Review Dashboard, export a File Review Report, and navigate to the list of Review Items. Review Managers can also do the following:
The Review Manager for a File Review can add new Non Document Review Items on an ad hoc basis (for example, if the Review Manager determines a necessary verification that was not included during File Review creation).
Prerequisites: To add a Non Document Review Item to a File Review, you must be a member of the TMF Create File Reviews feature group and you must be a member of a Review Manager Group for the template on which the File Review was based.
- Navigate to the Study Item List of the study for the File Review.
- From the Study Items Breadcrumb Menu, select “File Reviews.” The File Reviews List Page is displayed.
- Select the hyperlink for the File Review you want to work with. The File Review Items List Page is displayed.
- Select the gear icon above the list and select “Add Non Document Review Item” from the Actions Menu. The Create Non Document Review Item screen appears.
- In the Name field, enter text for the Non Document Review Item.
- Select “Create.”
A placeholder for the Non Document Review Item is added to the File Review Items List Page.
A Review Manager for a File Review can add Study Items as Review Items on an ad hoc basis (for example, if the Review Manager determines a document that needs to be checked but was not included during File Review creation).
Prerequisites: To add a Study Item to a File Review, you must have VIEW_FILE_REVIEWS permission and you must be a member of a Review Manager Group for the template on which the File Review was based.
- Navigate to the Study Item List of the study for the File Review.
- From the Study Items Breadcrumb Menu, select “File Reviews.” The File Reviews List Page is displayed.
- Select the hyperlink for the File Review you want to work with. The File Review Items List Page is displayed.
- Select the gear icon above the list and select “Add Study Items” from the Actions Menu. The Add Study Items screen appears, displaying an empty grid.
- On the Add Study Items screen, select the Select Study Items The Select Study Items screen appears, displaying a list of Study Items from the study.
- Select the check box for each Study Item to add as a Review Item. Use the Search field and Filters Panel to filter the list of Study Items as needed. Up to 50 Study Items can be added at one time.
- Select the Select button to add the selected Study Items to the list on the Add Study Items screen.
- Select “Create Review Items.”
The Study Items are added to the File Review Items List Page.
Note that if you have permission to view virtually deleted documents and any of the items selected are virtually deleted, an error will be displayed after selecting to Create Review Items (starting in version 2.9).
Review Items that are not necessary and are not specified as mandatory for the File Review can be removed from a File Review.
Prerequisites: To remove a Review Item, you must have VIEW_FILE_REVIEWS permission and you must be a member of a Review Manager Group for the template on which the File Review was based. In addition, the Review Item must have a status of Not Reviewed.
- Navigate to the Study Item List of the study for the File Review.
- From the Study Items Breadcrumb Menu, select “File Reviews.” The File Reviews List Page is displayed.
- Select the hyperlink for the File Review you want to work with. The File Review Items List Page is displayed.
- Locate the Review Item that you want to remove.
- Select the gear icon for the Review Item and select “Remove Review Item” from the Actions Menu.
- On the confirmation message, select “Ok.”
The Review Item is removed from the File Review, and any Action Items associated with the Review Item are deleted.
If the specified Review Manager is unable to oversee a File Review, a different Review Manager can be specified.
Prerequisites: To change the Review Manager, you must have VIEW_FILE_REVIEWS permission and you must be a member of a Review Manager Group for the template on which the File Review was based.
- Navigate to the Study Item List of the study for the File Review.
- From the Study Items Breadcrumb Menu, select “File Reviews.” The File Reviews List Page is displayed.
- Locate the File Review you want to work with within the list.
- Select the gear icon for the File Review and select “Edit Metadata” from the Actions Menu. The Edit File Review screen is displayed.
- In the Review Manager field, enter a new Review Manager. Only members of Review Manager Groups for the File Review Template can be specified as the Review Manager.
- Select “Save.”
Note: Any member of a Review Manager Group for the template on which the File Review is based can perform management operations in place of the specified Review Manager.


