Tag Archives: 2.5

Study Setup

The list of available studies to create is based upon the list of studies that have been loaded through the CTMS Data feed but have not yet been created in the eTMF. Starting the wizard for a Study creates the Study in a Draft state. The study remains in a Draft state until the wizard is finished successfully. A Wizard can be saved and resumed multiple times, if necessary, before all information is final and the process is finished.

To see how the eTMF Study Setup Wizard works

  1. Log in as a Study Owner.
  2. Select In-Process Wizards at the bottom of the User Home Page.
  3. Select Create Study
  4. Select a Study Wizard.
    For each eTMF, System Administrators will configure Wizards to align with the specific business processes in place.
  5. Select the Program Code associated with the study you are creating.
    The list of studies that are available to create comes from the CTMS Data Feed.
  6. Select the Study ID for the Study you are creating.
    After selecting a Study ID, the bottom of the screen will refresh with data associated with the Study from the CTMS Data Feed. This data can be used to verify that the correct study was selected.
  7. Choose if you’d like to include your study in the eTMF Study Management Metrics
  8. Click Next or Save.
    Clicking the Next button will take you to the next step in the wizard.
    Clicking the Save button will save the data you have completed and will exit you from the wizard.

Study Milestones

The Study Milestones step allows you to view any milestone dates already received from the CTMS Data Feed for this study.
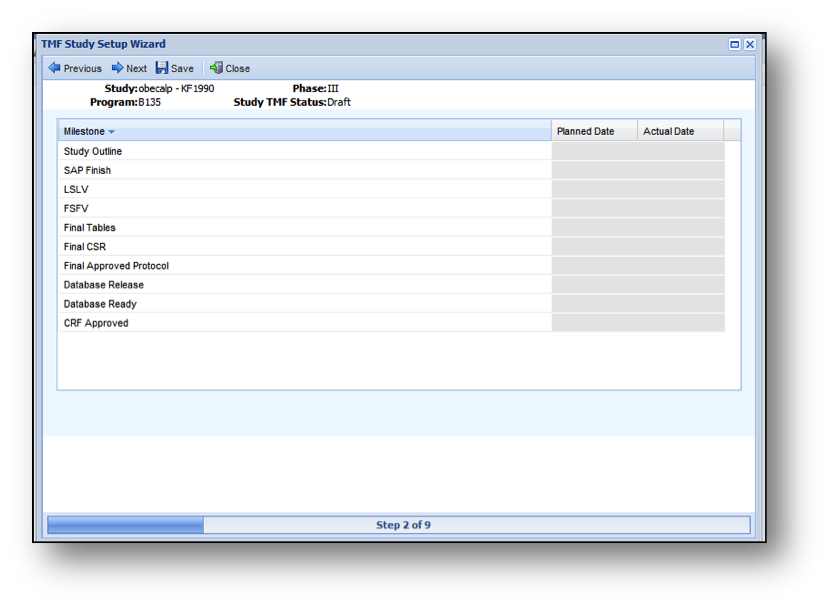
It also allows you to enter any Study Milestone dates that are configured to be user entered.

Edit the Planned Date or Actual Date columns for any Study Milestones that are user-enterable.
User-enterable fields appear with clear backgrounds. Other cells have gray backgrounds.

Editable date cells will show a calendar for setting a date.  In addition, you will be able to update user-entered milestones after the study is created.

Note:  Use the <Space> bar to instantly select today’s date from any calendar in the eTMF.

Questions

The wizard will progress through a series of questions about the study.
Based on your response, the eTMF will prompt you to add sets of document placeholders to the study.

Add Additional Items

Use this step to add any additional placeholders to the study. Select the checkbox next to an option in the list to add it as a placeholder.

Final Review
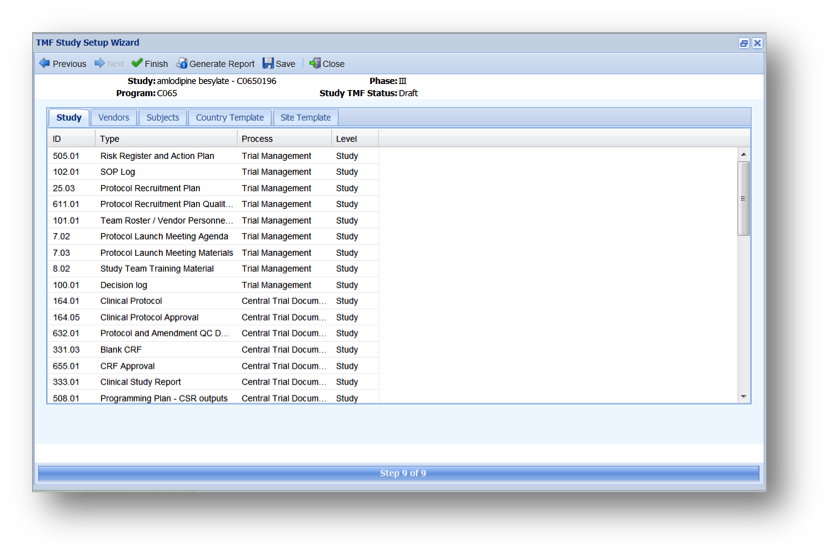
This step gives the Study Owner a chance to review all of the questions and responses.

Tabs on the final review screen include:

  • Study – Enterprise, Program, and Study level documents selected during the wizard
  • Vendor – Vendor documents selected during the wizard
  • Subjects – Documents selected for association with a new Subject
  • Country Template – Country level documents selected during the wizard. These will be added to the Country Template to automatically be selected for each new Country.
  • Site Template – Site level documents selected during the wizard. These will be added to the Site Template to automatically be selected for each new Site.

The following additional operations can be performed on this screen:

  • Previous – move back to the previous screen
  • Finish – completes the wizard and generates the resulting study items and template items associated with the study. The study is made Effective and is available for navigation within the application.
  • Generate Report – Generates the Study Wizard Report. This PDF file will list the selections made throughout the wizard. This is useful for review before selecting to finish the wizard.

Reconcile SMF Documents

eTMF provides the ability to Reconcile Sponsor and Site documents directly in the eTMF. A record of who reconciled each document and when it was reconciled is stored in the Audit Trail and included when a Reconciliation report is generated.

How to Reconcile a Document

Users in the TMF Reconcile Documents group can reconcile (and unreconcile) documents by selecting Reconcile / Unreconcile Documents on the Actions Menu on the Study Items List page. This will display the Reconcile / Unreconcile Documents dialog.

If a Country and Site were already selected on the Study Items List page, they will be automatically populated and reconcilable documents for the Site will be displayed in the top grid. Otherwise, a Country and Site must be selected to begin reconciliation. The grid will show all reconcilable documents (Final, Obsolete and Superseded documents that have not yet been reconciled). The bottom grid, when expanded, shows documents not yet available for reconciliation (those that will need to be reconciled in the future but that do not yet have final content).

Finding a Document to Reconcile

To locate a specific document that you want to reconcile, search for it by entering keywords (complete words) in the Find Item field. When you locate a document that you want to reconcile, you can click on its hyperlink to view its contents in another browser tab. After you confirm that it has been reconciled, select the document’s check box in the grid. Your name and the date will automatically be recorded.

If you reconcile a document in error, de-select the box next to “Show Unreconciled Only”. This will display reconciled documents so you can unreconcile them.

When you are done, close the screen or choose a different Country/Site combination to continue the reconciliation process.

Reconciliation information including all Study Items in the Study, Country, and Site that are part of SMF will be available in the Reconciliation Report.

Marking a Document as Not Applicable for Reconciliation

You have the option or marking documents as “Not Applicable” for reconciliation at a specific site. When a document is marked as “Not Applicable” it is removed from the list of reconcilable documents for the selected site in the dialog and can only be seen by selecting the Show Not Applicable check box. When displayed in the dialog, a Not Applicable document cannot be reconciled.

To mark a document as “Not Applicable,” move the applicability toggle to the right, enter a comment, and select Save. The action and comment is recorded in the document’s audit trail.

To mark a “Not Applicable” as “Applicable,” move the applicability toggle to the left.

See Also: What is Reconciliation?

View Reconciliation Dialog

The View Reconciliation Dialog is a read-only screen that displays all Sites at which the Document has been Reconciled. Users in the TMF Reconcile Documents group can reach the View Reconciliation Dialog by selecting the Actions Menu on a Document that is needed for SMF and selecting View Reconciliation Information.

The View Reconciliation Dialog displays information regarding the Document’s Site, Name, who it was Reconciled By, and the Date it was Reconciled.

What is Reconciliation?

There are two files in a study: Trial Master File and Site Master File (also known as Investigator Site File). The SMF/ISF is in control of the site and the sponsor does not have access to it. However, there are documents that should be both in the SMF and TMF/ISF. Reconciliation is a process that allows you to verify that the documents that are stored in the TMF are also found in the SMF/ISF.

Breadcrumb Trail

A breadcrumb trail is displayed on most list pages in eTMF. The breadcrumb trail contains one or more segments that help users to:

  • Track the view they have accessed and navigate to related views (e.g., Work Area, Favorite Study Items, etc.)
  • Filter the list of items displayed by study, country, and site

The breadcrumb trail on a study item list is shown below, underneath the eTMF header.

Each segment of the breadcrumb trail is discussed below.

Home

The first segment of the breadcrumb trail displays the home icon. You can click on the home icon to navigate directly to the related home page:

  • If the list is filtered for a particular study (using the Studies breadcrumb segment), then clicking on the home icon takes you to the Study Home page.
  • If the list is not filtered for a particular study, then clicking the home icon takes you to your User Home page.

Studies

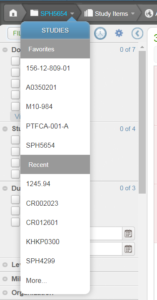
The second segment of the breadcrumb trail indicates the study by which the list is filtered. You can click on the arrow within the segment to easily navigate to a list for a different study from an Actions menu. The menu lists your favorite studies and recent studies. If you want to view items for a study not listed, you can click on “More” to search for the study. On all views except the study items list and packages list, an option is also available in the menu for displaying information across “All Studies.”

When you change the study selection within the breadcrumb menu, the Study Countries and Study Sites breadcrumb segment selections are reverted to the default selections (All Countries, All Sites).

View

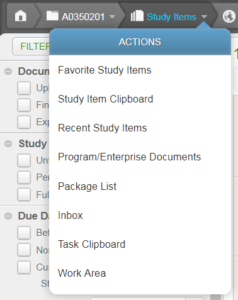
The third segment of the breadcrumb trail indicates the list view you are accessing. You can click on the arrow within the segment to access a menu of other views you can navigate to.

When you change the view selection, all other current breadcrumb selections are maintained. For example, if you are currently in the study item list view for study A0350201 and have selected “United States” from the country breadcrumb segment, when you select to view the Inbox from the breadcrumb segment menu, the study and country selection will remain the same.

Study Countries

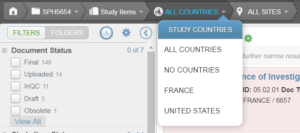
The fourth segment of the breadcrumb trail indicates the country within the selected study for which to display items.

If “All Countries” is selected, then the list displays all country level study items within the selected study, as well as study-level study items, program-level study items, and enterprise-level study items.

If “No Countries” is selected, then the list displays only study-level, program-level, and enterprise level study items.

If a specific country within a study is selected, the list displays all country-level study items for the selected country AND all study-level study items, program-level study items, and enterprise-level study items.

Note: If you want to see only country-level study items for a selected country and omit higher-level study items from the display, you must do the following:

  1. Select the country from the Study Countries breadcrumb menu.
  2. Apply a filter in the Narrow Choices panel by expanding the Level category and selecting “Country.”

Sites

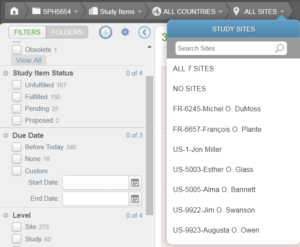
The last segment of the breadcrumb trail indicates the site within the selected study for which to display items.

Sites are listed by country code, site ID, and PI name. You can find a specific site using Search text that includes any part of the site name. For example, you can locate the site for which Jim O. Swanson is the PI by typing “Swa”. When a specific site is chosen, the study item list updates to display all site-level study items for the selected site, all country-level study items for the associated country, and all study-level, program-level, and enterprise-level study items. In addition, the Study Countries breadcrumb automatically updates to the appropriate country.

If you select “All Sites” from the menu, then the list displays all site-level study items for sties within the selected country (if a country was selected from the Study Countries breadcrumb menu), as well as all study-level study items, program-level study items, and enterprise-level study items.

If you select “No Sites” from the menu,  then the list does not display any site-level study items.

Note: If you want to see only site-level study items for a selected site and omit higher-level study items from the display, you must do the following:

  1. Select the site from the Study Sites breadcrumb menu.
  2. Apply a filter in the Narrow Choices panel by expanding the Level category and selecting “Site.”

Document Upload Methods

Ways to Upload Documents

IfThen
You are able to locate the study item for a single document to upload and have your file Drag and Drop to Study Item
You are able to locate the study item for a single document.Upload to Study Item
You have a document without a study item created for it or you don't know which study item is correctUploading One or More Documents
You have large batches of documents, or even small batches of similar documentsUploading One or More Documents

Announcements

Announcements can be displayed on your User Home page and on Study Home pages.

Announcements are an effective way to communicate system-wide and study-wide messages such as:

  • Notice of upcoming audits, sponsor visits and study events
  • Reminders of updates to processes and required training
  • Guidance to direct work towards specific studies, sites or milestones

On a Study Home page, the top-center area can be toggled to display Study Announcements or My Study Notes. If toggled to display study announcements, the area shows all announcements related to that study only.

On User Home pages, the Announcements area shows all system-wide announcements, as well as the study-specific announcements for your studies.

Related: Announcement and Note Editor

To view an announcement in its entirely, click on the announcement text. This action highlights the announcement and displays icons for editing, dismissing, or deleting the announcement (based on your permissions).

Toggle Between General and All Announcements on the User Home Page

Use the “Show General” and “Show All” options from the Actions menu in the Announcements section of the User Home page to toggle between seeing All Announcements and only General (Not Study-Specific) Announcements.

Dismiss Single Announcement

You can dismiss an announcement to remove it from your display.

Dismissing a study-specific announcement will remove it from both the Study Home and your User Home.

If you are an announcement author and want to delete your announcement for everyone, use the Announcement and Note Editor.

To remove an announcement from your display:

  1. Click once on the Announcement to display icons for available actions.
  2. Click the “X” to dismiss the announcement.

Dismiss All Announcements

To clear your Announcement area of all announcements:

  1. Click the Actions menu icon in the Announcement area.
  2. From the Actions menu, select “Dismiss All.”

This action can be undone using the “Restore All” option.

Restore Announcements

To restore all dismissed announcements:

  1. Click the Actions menu icon in the Announcement area.
  2. From the Actions menu, select “Restore All.”

Print Announcements

To print all announcements in your display:

  1. Click the Actions menu icon in the Announcement area.
  2. From the Actions menu, select “Print.” A PDF file will open in a separate window.
  3. Print the PDF.

How to Filter Items

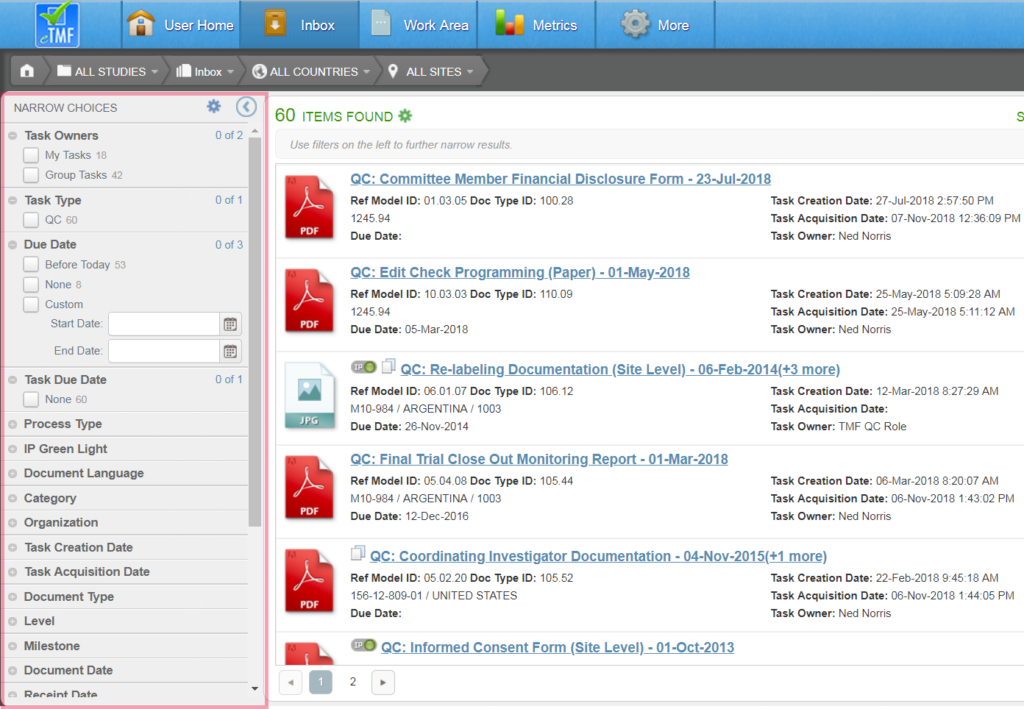
The Narrow Choices panel, located on the left side many list-based screens and dashboards, allows you to find items based on specific values/qualities.

Values in the Narrow Choices panel are organized by category. The categories and values displayed depend on the view being accessed. For example, the Narrow Choices panel in the Inbox view contains a category for Task Due Date that is not relevant or available in the Narrow Choices panel in other views. The number next to each value in the Narrow Choices panel indicates the number of items in the list to which that value applies.

If a category contains more than five values, a View All link is shown underneath the fifth value in the category. Clicking this link either displays the rest of the values or opens a separate window from which you can view all possible values in the category.

If you want to hide the Narrow Choices panel to get a larger view of the items list, click the Show/Hide Filters button at the top right of the panel (i.e., the arrow enclosed by a circle).

Define a Filter

To filter down the displayed items, expand a category and select the check box next to a value in the Narrow Choices panel. This will add a filter value above the list in the Filter Summary bar and will automatically update the list to include only those that apply. You can select as many check boxes as you like to apply multiple filter values. When multiple check boxes are selected, only items that meet all criteria are displayed.

To remove a single value from a filter, either deselect the box next to the value in the Narrow Choices panel or select the X next to the value in the Filter Summary bar. All filter values can be cleared by clicking the trash can icon in the Filter Summary bar or by clicking the Actions menu icon at the top of the Narrow Choices panel and selecting “Clear Filters.”

Saving a Filter

You can save a filter that you commonly use so that you can easily apply the criteria later. Click the link to learn more.

Using the Inbox View

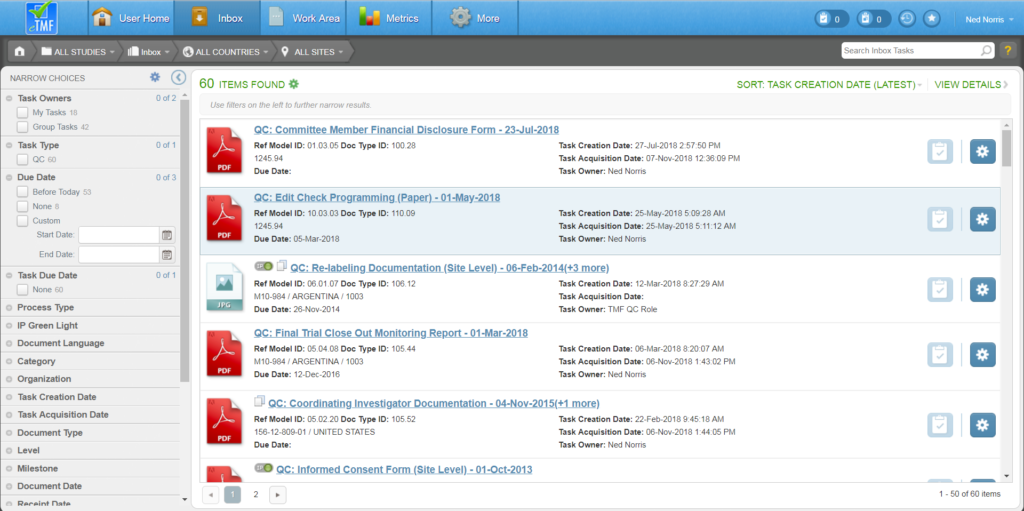
From the Inbox view, you can do the following:

  • Use the Quick Search by entering text in the Search Inbox Tasks field at the top right.
  • Use filters to reduce the list of tasks to display just those you want to work on.
  • Use the Breadcrumbs to reduce the list of tasks to those related to a particular study, country or site.
  • Use Sort to arrange the tasks in a custom order.

Click on a task’s name to work on it. Or, click on the View Details link under the Search Inbox Tasks field to work on tasks in order.

image_pdf