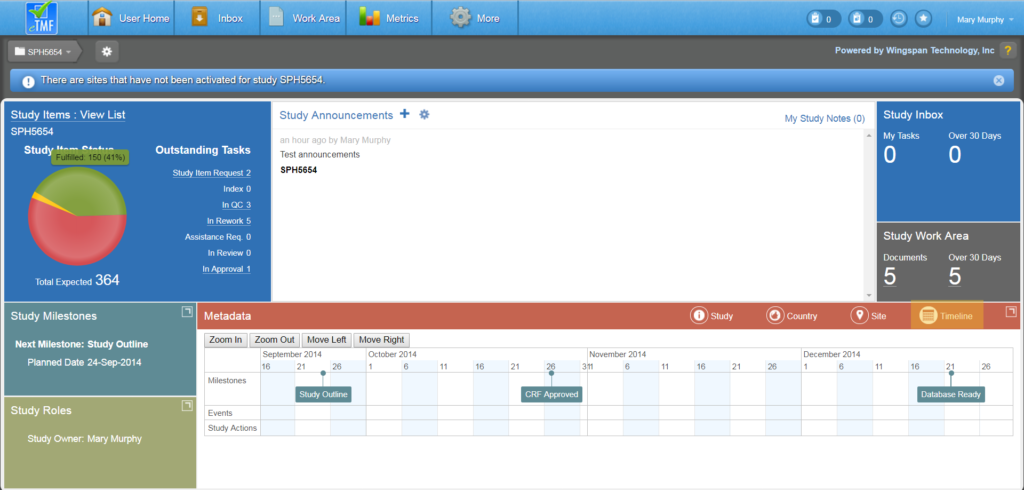
A Study’s Home Page is a central location for viewing important information about the study and for performing various study-related actions.
The Study Home page provides an overview of the health of the study using various interactive charts, tables, and tiles that display study metrics and study item status. The Study Home page also provides direct access to study items and tasks. Details on each section of the Study Home page are explained below the image.
The Study Roles, Metadata, and Study Milestones tiles can be expanded for easier viewing by selecting the expand button in the top right corner of the respective tiles. You can switch between panel screens and maximize each for easier viewing of your data. See below for a description of each tile.
Study Items
The Study Items tile displays a visual representation of study items in various statuses within a pie chart. You can hover over a section of the pie chart to display the status name, number of study items, and the percentage of those study items with that status in relation to the total number of study items. The total number of study items is listed below the pie chart.
The tile also lists a breakdown of the counts of outstanding tasks by type. Both the pie chart and task counts are clickable for users with appropriate permissions and take the user to a filtered list of the relevant Study Items
At the top of the tile, you can click on the link to access an unfiltered list of study items for the study.
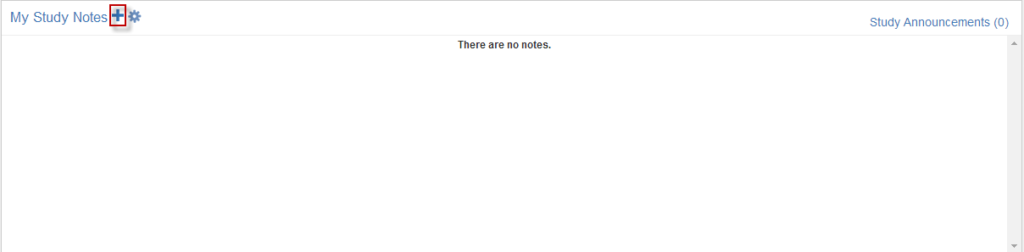
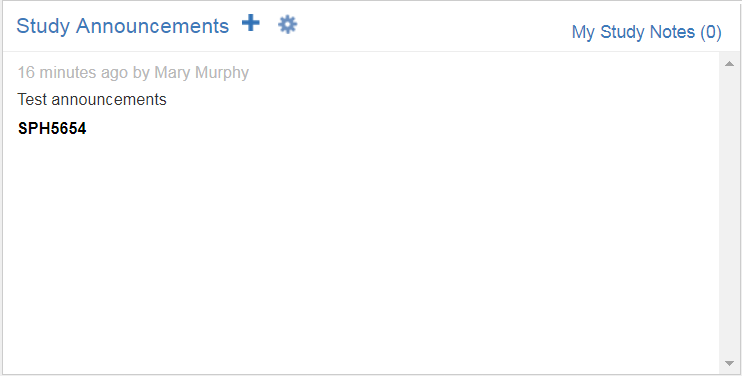
Study Notes and Announcements
In the Study Notes and Announcements tile, you can toggle between the display of study-specific notes and announcements using the link in the tile’s header.
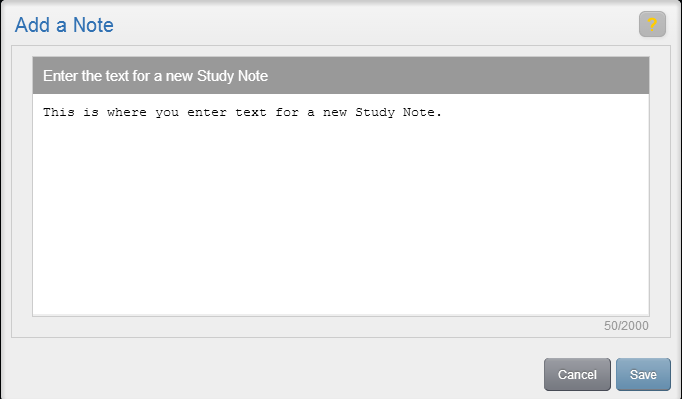
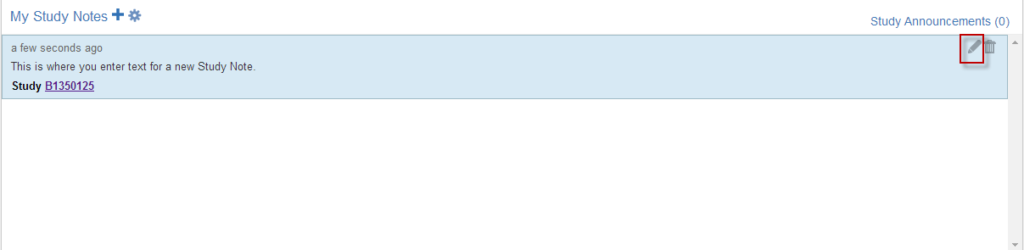
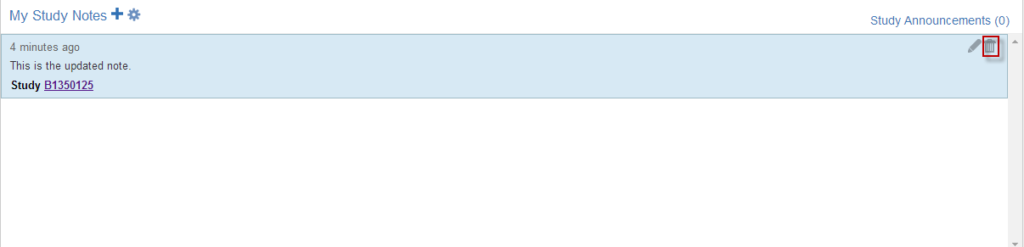
The notes displayed are notes you’ve added within the Study Home page as reminders. You can print notes or remove notes using the Actions menu.
The announcements displayed are those added by a qualified user (i.e., a user with Create Study Announcements permission) to the Study Home page. You can dismiss notes you’ve already seen or print notes using the Actions menu.
Study Inbox
The Study Inbox tile displays a count of your uncompleted tasks within the study and a separate count of your tasks created over 30 days ago. If you have View Group Tasks permissions, you can also see the total number of uncompleted tasks within the study that are assigned to your group inbox and the number of those tasks that were created over 30 days ago.

Any counts over 0 are displayed as hyperlinks to the Inbox, filtered as appropriate.
Study Work Area
The Study Work Area tile displays a count of the number of documents in your Work Area for the study and a count of the documents that were created over 30 days ago.
Any counts over 0 are displayed as hyperlinks to the Work Area, filtered as appropriate.
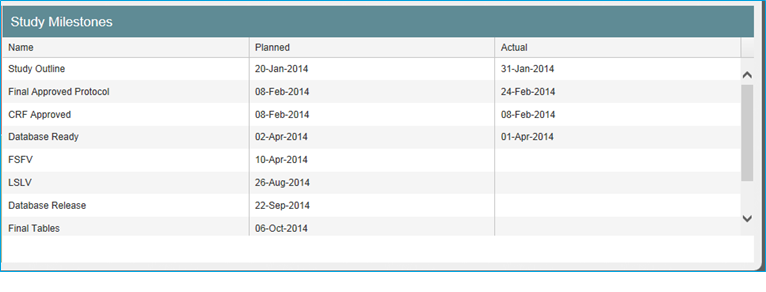
Study Milestones
Click on the icon in the upper right corner of the Study Milestones tile to expand the tile’s display. When expanded, the tile lists all study level milestones that were loaded from CTMS data. In some cases, milestone dates are editable by a Study Owner or Business Administrator.
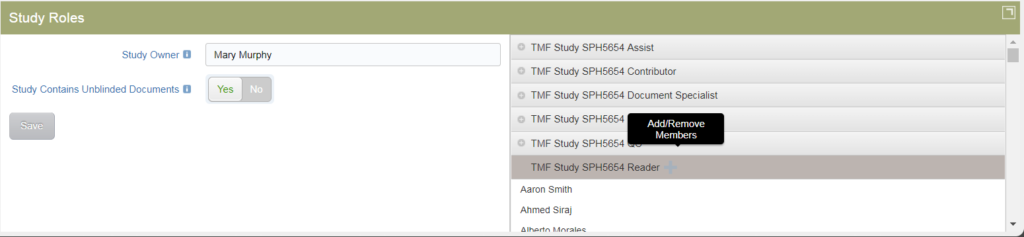
Study Roles
Click on the icon in the upper right corner of the Study Roles tile to expand the tile’s display. When expanded, the Study Roles tile shows the users/roles that are part of the study. The Study Owner is listed on the left, along with an indicator that shows whether or not the study contains unblinded documents. Either of these settings can be changed by an authorized user.
On the right side of the tile, all study-specific groups are listed. You can expand a group to see its members. If you have the appropriate permissions, you can also add or remove members from the area. Members can be added / removed in this section if you have the appropriate permissions.
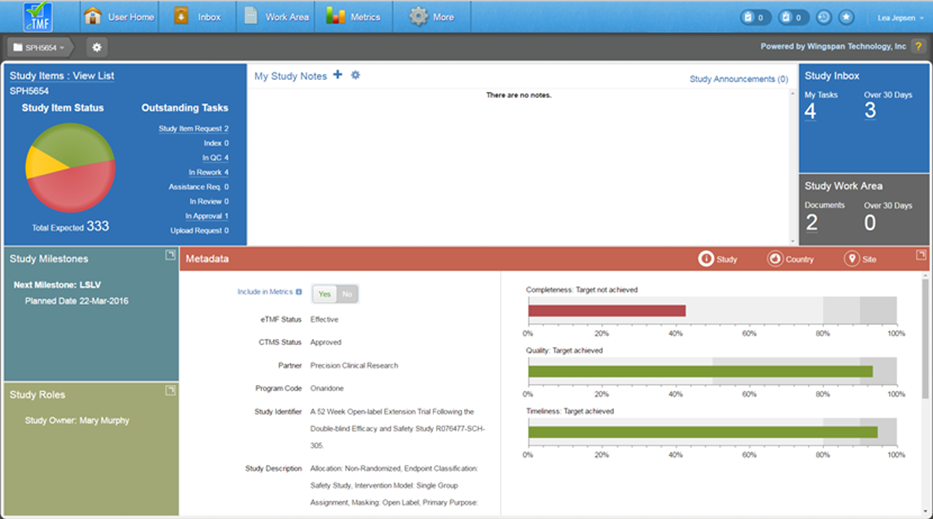
Study Metadata
The Metadata tile shows information relating to Study, Country, Site, and Timeline metadata as well as relevant metrics. You can toggle between Site, Country, Site, and Timeline Metadata simply by clicking on the designated icons.
The Study metadata is shown by default and displays basic information about the study, including status, sponsor, partner, etc. If you have the appropriate permissions you can change the sponsor and partner values from this section or choose whether or not to include the study in performance metrics. It is recommended to omit this setting for categories of studies where performance metrics computations are not relevant, such as migrated studies.
On the right side of the study metadata section, bar charts are displayed for the completeness, quality, and timeliness metrics if corresponding data is available. You can hover over a bar chart to see the current percentage value for the metric and the target percentage value. You can click on a bar chart to drill down to the corresponding dashboard.
Countries
For each country in the study, you can see the total number of sites (based on CTMS data), the total number of sites with in-process wizards, and the number of sites that have been activated in the eTMF. This allows you to take action where needed. If you have permissions, you can perform the following actions for each country listed:
- View Completed Country Wizard
- Edit Site Template (e.g., to add document types required when creating a new site for the country)
- Edit Principal Investigator Template (e.g., to add document types required when loading a new principal investigator for a site within the country)
- Edit Sub-investigator Template (e.g., to add document types required when loading a new sub- investigator for a site within the country)
- Edit Other Site Personnel Template (e.g., to add document types required when loading new non-investigator site personnel for a site within the country); available in version 2.6
Sites
In the Sites Metadata section, you can see a list of all sites within the study. For a selected site, you can see specific details, such as name, PI, status, etc. You can also toggle lists of site milestone dates and monitoring visit dates. Depending on the setup and your permissions, you may be able to edit milestone dates and/or add monitoring visits.
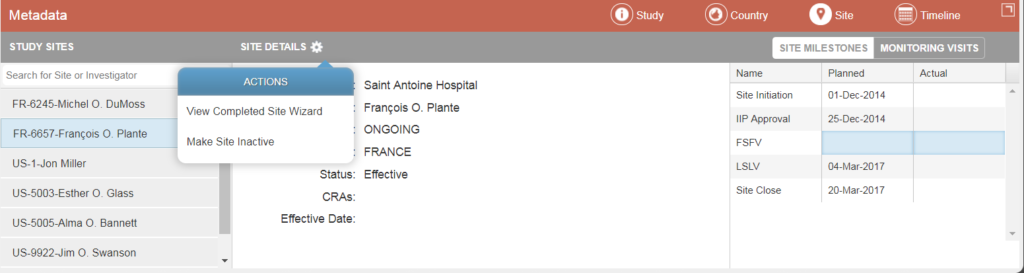
From the Actions menu, you can view the completed site wizard or make the site inactive.
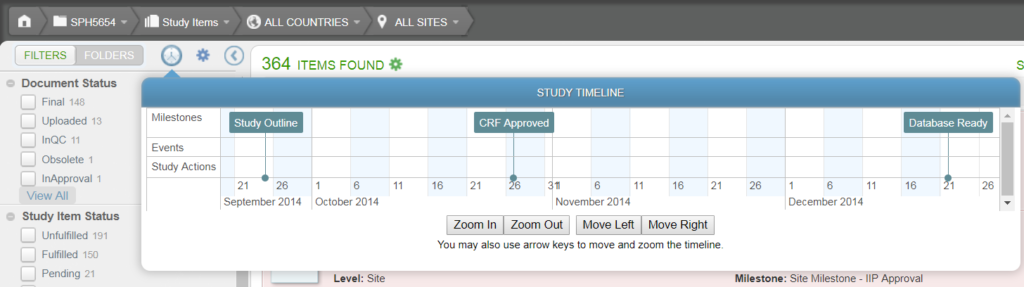
Timeline
Clicking on Timeline displays details about Milestones, Events, and Study Actions, and the associated dates. For more information, see Timeline View.
Study Home Page Actions Menu
An Actions menu is available at the top of the Study Home page, next to the breadcrumb. Within the Actions menu, you can select the following options, based on your permissions:
- Activate Country in eTMF (Allows you to run the country wizard to set up a country)
- Add Study Item
- Execute Event
- Reports (Allows you to access Coming Due/Past Due Report, Completed Study Wizard Report, Country Wizard Report, Package Report, and Study Lock Readiness Report)
- Templates (Allows you to access the templates for country, global site, subjects, and monitoring visits)
- ISF Export
- Lock Study
- Rename Study