Tag Archives: 2.5

Tasks Clipboard

In eTMF, you can collect a task or set of tasks to work on by adding them to your Tasks Clipboard. To do this, select the Add to Clipboard icon next to the desired task in the Inbox. Once the item has been added to your clipboard, the number on the Tasks Clipboard button in the application header will update.  In the image below, the first task listed in the Inbox has been added to the Tasks Clipboard.

To view tasks on your clipboard, click the Tasks Clipboard button and select “View Task Items” from the menu.

On the Tasks Clipboard view, you can work tasks in the same way as you do within the Inbox. The Clipboard simply isolates a selected set of tasks.

To remove an individual item from the Tasks Clipboard view, select the Remove from Clipboard icon next to that task. The Task will be removed from the view once the page is refreshed,  and the number on the Tasks Clipboard button will be updated. You may remove all tasks from your Clipboard by selecting the “Remove All Tasks from Clipboard” option from the Clipboard view’s Actions menu or from the Tasks Clipboard icon’s Actions menu in the application header.

Inbox Overview

The Inbox holds tasks that need to be processed in the eTMF. You will have a Personal Inbox and, depending on your role in the system, may have a Group Inbox.

Personal and Group Inboxes

Your Personal Inbox contains tasks that you have acquired for processing. Group Inboxes are mailboxes within the eTMF that allow multiple users in a group (for example, Document Specialists) to view and accept tasks assigned to the group.

Accessing Your Personal Inbox

From any page, click the Inbox button on the application header. To see the tasks marked as “My Tasks”, select My Tasks under the Task Owners category in the panel on the left side of the screen. You can also access your Personal Inbox by selecting your “My Tasks” count within the Inbox tile on your User Home page.

Accessing Your Group Inbox

From any page, click the Inbox button on the application header. To see the tasks marked as “Group Tasks”, select Group Tasks under the Task Owners category in the Narrow Choices panel on the left side of the screen.

All QC tasks are directed to the Group Inbox for Document Specialists. A Document Specialist can acquire tasks from the Group Inbox to work on based on their specific responsibilities and priorities. For example, a Document Specialist can filter tasks based on study or site, language, whether required for IP Green Light, or due date. Once a task is acquired by a Document Specialist, it will then be in their Personal Inbox.

Note: If you have Uploaded a document or performed any rework or correction you will not be allowed to QC it.

Return to Group Inbox

A group task that was acquired by a user can be returned to the group Inbox to allow another user to acquire it. The act of returning a task to the group Inbox reassigns the task to the group for the task type.  You can return your own tasks to the group Inbox, or you may return tasks on behalf of another user if you have permission to manage other Inboxes. Tasks may be returned individually by selecting the “Return to Group Inbox” option from the task’s Actions menu or in bulk.

To return all tasks in the Inbox to the Group Inbox, click the Inbox view’s Actions menu icon and select “Return All Tasks to Group Inbox.”  If more than 50 tasks are listed, you will be alerted that you can only return a maximum of 50 tasks at a time. Clicking Ok on the alert will allow you to proceed with the first 50 tasks selected.

The Return All Tasks to Group Inbox window will display all tasks which can be returned to the Group Inbox. Exclude any tasks that you do not wish to return to the Group Inbox by selecting the check box for those tasks and click Return Selected Tasks. The selected tasks will be reassigned to the Group Inbox and will no longer appeared in the previously assigned user’s personal Inbox.

Task Details

The Task Details view allows the user to view document content and metadata while completing  their assigned task.

Each section of the Task Details view is described below.

Document Panel

Content (if any) is displayed in the Document Panel.

Users can use the scroll bar within the panel to navigate among different pages of content.

At the top of the Document Panel, an Actions menu icon provides options that allow you to view the content outside of the application and view the audit trail.

Below the Actions menu icon, additional icons are available for rotating the content, downloading the content locally, or printing the content. If the content contains bookmarks, a bookmark icon is also displayed, providing access to a menu of bookmarks. The user can select a bookmark from the menu to navigate to a specific section of the document.

Icons at the bottom right of the Document Panel can be used to adjust the page display as follows:

  • Fit to page/fit to width:  allows the user to enlarge the content so that it utilizes the width of the viewing area or reduce the content so that it fits within the height of the viewing area
  • Zoom in: allows the user to adjust the focus so that the text is larger; each click of the icon increases the size incrementally
  • Zoom out: allows the user to adjust the focus so that the text is smaller; each click of the icon decreases the size incrementally

In review tasks, icons are displayed along the bottom of the Document Panel for creating annotations within the content (not shown above).

Workspace Panel

The Workspace Panel displays task outcomes, indexing instructions, metadata, relationships, and any personal notes you’ve added in separate, collapsible sections. To complete the task, expand the Task section and select an outcome. Available outcomes are based on the type of task.

At the top of the panel, a drop-down list provides access to previous versions of the content. The arrow icon to the left of this drop-down enables you to hide the Workspace Panel and expand the display of the Document Panel.

List Navigation Panel

The List Navigation panel is useful for navigating quickly among tasks in your Inbox.

When you access the Details view by clicking the View Details link within the Inbox (see below), the List Navigation Panel displays a list of all tasks in your inbox. The content and metadata of the first task are open within the Document Panel and Workspace Panel, respectively. Once the user selects an outcome for the open task, the next task in the list will automatically open in the same view. This allows you to work through a list of tasks without having to manually open each one.

Facet Picker

If a Facet category has more than five values, the View All link will display below the fifth option in that category. Selecting View All will either display the rest of the values, or, if there are too many values to be displayed, the Select Values window will appear.

The Select Values window allows the user to scroll through a list of all available values in that Facet category and select the appropriate value(s) to be applied to the Items List. If the user knows exactly what Facet they are looking for, the name of that facet can be entered into the Search for values containing field. The numbers next to each value signify the number of items associated with that value.

Once the desired value(s) have been selected, click Apply to filter the list by the selected values.

Removing a Value

Value(s) can be removed from an existing filter by selecting the X next to a value in the filter summary bar above the list or by deselecting the check box next to the value(s) within the Narrow Choices panel. Once a value is removed from a filter, the list will automatically update. You can remove all filter values at once by selecting the trash can icon in the filter summary bar.

Favorite Study Items

Favoriting a study allows you to isolate a set of study items you want to refer back to . Study items can be favorited from the Study Item list page, the Study Items Clipboard, or the Recents page.

Favoriting a Study Item

To favorite a study item, select the study item and then select the Add to Favorites icon (star icon).

Once the icon has been selected, the icon will change color to visually indicate that the study item has been favorited.

To favorite multiple study items at once, filter the list so that it contains only the study items you want to favorite. Then select “Add All to Favorites” from the list’s Actions menu.

Accessing Favorites

To view the Favorites page, click on the Favorite Study Items icon (star icon) in the application header.

The Favorites page provides a Narrow Choices panel, sort options, and Actions menus with the same options available to the user from the study item list.

Unfavoriting Study Items

To unfavorite a study item, simply re-select the favorite icon. The icon will change color to visually indicate that it is not a favorite, and the study item will no longer appear on the Favorites page.

To unfavorite all study items, go to the Favorites page and select “Remove All From Favorites” from the Actions menu.

Upload Program & Enterprise Study Item

Use the steps described on this page to Upload a Program Level Document or an Enterprise Level Document so that it can be finalized and associated with studies. See Program and Enterprise Documents for an overview of how these types of documents work in the eTMF.

Each Enterprise Level Document and Program Level Document must first be uploaded independent of a study and finalized before it can be associated with specific study items.

NOTE: Not all users can upload Program or Enterprise documents. Permissions depend on your eTMF configuration.

  1. Upload one or more documents using the Upload Document(s) button in your Work Area.
  2. On the Upload to Work Area screen, click Add Files and select one or more files from your local network. Do NOT assign a study, country or site value on the Upload to Work Area screen.
  3. Click Upload. The files are uploaded to your Work Area.
  4. Select the hyperlink for one of the uploaded files in your Work Area to open the Details view.
  5. Click Edit in the Index area of the Workspace panel. The Match to Study Item screen appears.
  6. Click the Program/Enterprise Document Types link at the bottom of the screen.
  7. Use the Search field and/or Level, Organization, or Category fields to locate the correct document type. Select the document type from the list and click Save.
  8. On the New Program/Enterprise Document screen, complete any required fields (i.e., those outlined in red).
  9. Click Save to return to the Match Program/Enterprise Document screen. The program/enterprise level study item is listed at the top.
  10. Click Save on the Match Program/Enterprise Document screen. You are returned to the Details view for the study item.
  11. Proceed as normal with indexing and submit to QC. Once the document has been finalized, it can be associated with study items in individual studies.

Select Document Type

You can select the specific Document Types to which a Document Template or Workflow Definition applies from the master list.

To filter the master list, use the Search field or filter fields on the left panel. Then select the check box for a master list item to add it to the list of chosen items at the top of the screen.

To remove a selected item from the list of items chosen, select the X to the left of the item.

To apply your selections, select “Done.”


Workflow Definitions List

A workflow definition is a template for a review or approval process. The definition contains specifications that determine when the template is available for selection (e.g., for which type of process and which document types) and the specific tasks that must be assigned within the workflow.

Users with Manage Workflow Templates feature permissions can add workflow definitions on the Workflow Definitions page, which can be accessed by selecting “View eTMF Configurations” from the More menu in the application header and then by selecting “Workflow Definitions” from the Breadcrumb menu. Click here for details on workflow definition specifications.

A workflow definition must be made Effective to be available for selection by users who initiate workflows. You can make the definition effective using the “Make Effective” Actions menu option.

If you need to make changes to the definition after it is Effective, you must first return it to Draft status using the “Revise” Actions menu option and then use the “Edit Metadata” option to actually make the changes. The Effective definition remains in use while edits are made to the Draft version. To use changes made in a Draft version, you must make the version Effective again.

An effective version can be made Obsolete in order to remove it from use. Obsolete definitions cannot be selected when initiating a workflow. To make an Effective workflow definition Obsolete, use the “Make Obsolete” Actions menu option. If needed, an Obsolete definition can be made Effective again using the “Make Effective” Actions menu option.

Create Workflow Definition

A workflow definition is a template for a specific workflow process. The definition determines the applicable process type (i.e., review or approval), the tasks to assign, and the specific  document types to which it applies.

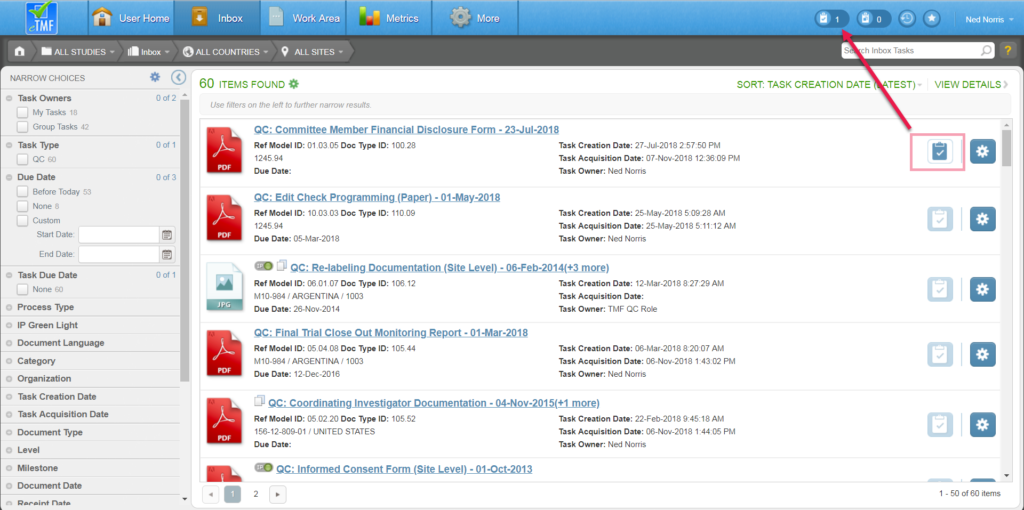
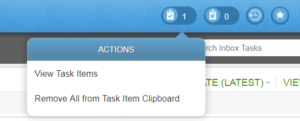
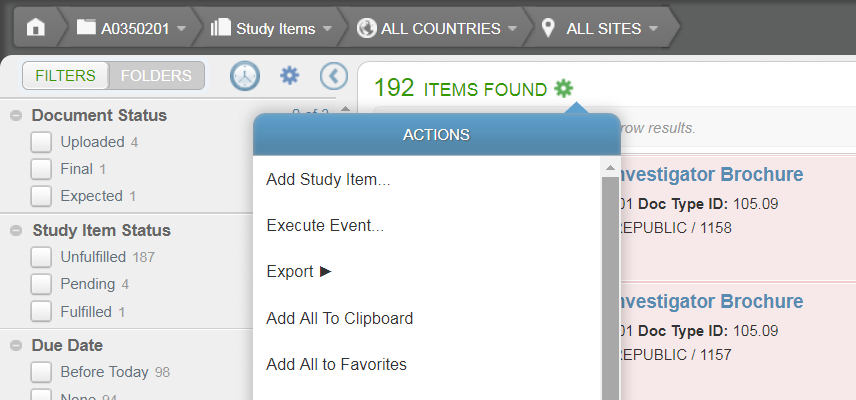
To create a new workflow definition, click on the Actions menu icon on the Workflow Definitions List Page and select “Create Workflow Definition.” Or, to edit the metadata of an existing Workflow Definition, click on the Actions menu icon for a specific workflow definition and select “Revise” to create a Draft version. Access the Actions menu again and select “Edit Metadata.”

Complete the fields listed below and click Create (new workflow definition) or Save (existing workflow definition.

Note: To use the workflow definition, you must make it Effective.

Name

The name for a workflow definition should uniquely and succinctly identify the template.

Description

The description of the workflow definition is optional.

The description will be displayed to a user who selects the template when initiating a workflow. Ideally, the description should provide a helpful preview of the template’s purpose and contained tasks.

Process Type

A single process type must be selected for the workflow definition. There are 2 process types in eTMF: Review and Approval. The process type for a workflow definition determines:

  • The workflow task definitions that can be added to the definition as steps in the workflow (i.e., those with the same process type)
  • The specific workflow during which the template will be available for use  (e.g., if Review is the process type, the template will be available for use only when initiating a Review workflow and not when initiating an Approval workflow)

If multiple workflow definitions have the same process type, then multiple templates will be available for selection when initiating a workflow for that process type.

Workflow Definition ID

In the Workflow Definition ID field, select from a list of system IDs that determine the inherent characteristics of the workflow, including the allowable number of tasks.  Available options include:

  • TMF Single Stage Workflow:  The workflow contains a single task. Depending on the task definition, the task may be assigned to multiple recipients, each of whom will receive the task at the same time.
  • TMF Two Stage Workflow: The workflow contains two tasks. The second task will be created only after the first task is completed. Depending on the task definition, each task may be assigned to multiple recipients.
  • TMF Two Stage Workflow with First Stage QC Review Task: The workflow functions as a combined review/approval workflow that contains two tasks. The first task is a “QC Review” task that requires the owner to perform a QC-like Review on the document and metadata. If the QC Review passes, a second task, an approval task that can be assigned to multiple recipients, is created.

Tasks

The Tasks table is populated with a preset number of tasks based on your selection in the Workflow Definition ID field.  Each task record must be mapped to a workflow task definition. To map to a workflow task definition, click in the Task Template Name column and select from a list of workflow task definitions with the same process type as that selected for the workflow definition.

Note that to completely remove a task from an existing workflow definition, you must change the Workflow Definition ID.

Document Types

If the workflow definition will apply to all Document Types, select “Yes” under Applies to All Document Types.

If the workflow definition will not apply to all Document Types, select “No” under Applies to All Document Types and click Select Document Types. This will display the Select Document Types window. Click here for instructions on completing the document types selection.

image_pdf