If corrections are required for the document’s content or metadata, follow these steps:
- Click the Fail button
- Choose a person to address the issue(s) (displays document submitter and owner; others can be chosen by searching in the Type user name field)
- Choose one or more reason codes (to select multiple codes hold down the Ctrl key)
- Enter comment if desired
- Choose the Request Rework button
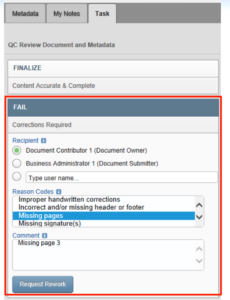
The task will be sent to QC rework.
If you would like to Correct (make changes to) the metadata for a document in QC, use the following steps:
- Choose the Correct button
- Correct metadata and/or Indexing on the Metadata tab
- Return to the Task tab and choose one or more reason codes (to select multiple codes hold down the Ctrl key)
- Enter comment if desired
- Choose the QC button.
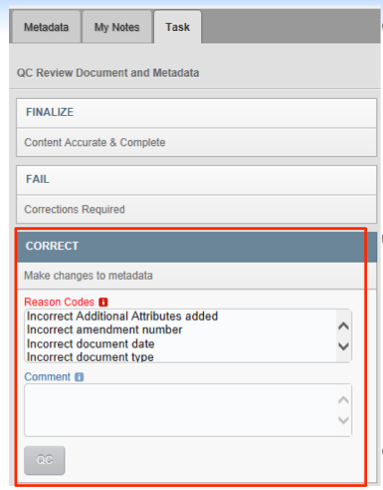
The Item will be sent for QC.
Note – You will not be permitted to acquire the QC task because you previously corrected the document.
Based on an environment setting, you may be able to finalize the document after making corrections, instead of sending the document to another round of QC. If this setting is active in your environment, a Finalize button will appear in place of the QC button shown above. If the Finalize button is selected, the metadata changes will be saved, the workflow will be completed, and the document finalized.
Note – Corrections do not count as Rework when calculating quality.
Use the eTMF Login page to provide your credentials and begin using the eTMF.
Log In With User Name and Password
- Follow the URL provided by your system administrator.
- Enter your user name in the User Name field (your User Name is different than your email address).
- Enter your password in the Password field.
- Click Submit.
If your login is successful, you will see your eTMF Home.
If your login is not successful, you will see an “Invalid user name or password” message.
Note: If you are logging in for the first time, use Forgot Password to set your initial eTMF password, if it hasn’t been set already.
Log In With SAML
If your eTMF is configured to use SAML and your administrators have configured your account to authenticate via SAML, you will see an additional SAML button on the login screen. This additional button will be configured to authenticate your account using SAML and send you into the eTMF.
To log in to the eTMF, click the SAML-authentication button.
Clicking the Select Sites button on the Create User Restriction screen will display the Select Sites for User Restriction screen.
Clicking a site in the lower grid will add the site to the list of restricted sites for that user. The selected sites will display in the top grid. If you would like to remove a site that you previously selected, click the X next to that selection.
Sites can be filtered by choosing the options to the left of the grids.
Once you have selected the appropriate sites for the user, click the Select button in the bottom right corner of the Select Sites for User Restriction screen.
You will be returned to the Create User Restriction screen.
Restricting users to a specific site or sites is useful for limiting regulators to see only the content they need to see.
To create a User Restriction, select the Actions Menu on the User Restrictions List Page and select Create New User Restriction. To modify an existing User Restriction, select the Actions Menu associated with that Restriction. This will open the User Restriction Property Editor.
You must first enter a Restricted User in the Restricted User field. For a user to be eligible to be added to this field they must be in a Regulatory Agency group for a specific study (or for multiple studies). Business Administrators can add users to a study-specific regulatory group from the User Administration page.
Once you have selected a Restricted User you need to select a Site or Sites for the user to be restricted to. To do this, choose the Select Sites button under the Restricted Sites grid.
Once you have selected the Site(s) for the user to be restricted to and select Create, the user will not be able to view sites other than those which you selected.
Note: A regulatory user will not have access to any site or country level documents in a study unless user restrictions (which specify the country/site combinations to give access to) are defined for that user.
User Restrictions apply only to regulators (users in the Regulatory Users group). Restrictions allow an organization to limit (i.e., provide) the regulator’s access to a specific country or countries, or to specific groups within the designated countries.
Users with appropriate permissions can access the User Restrictions List Page by selecting Manage User Restrictions under the More Actions Menu in the Top Bar.
Creating a New User Restriction
To create a new user restriction, select the actions menu next to the items found count on the User Restrictions page and select Create New User Restriction.
Restrictions can be sorted by selecting one of the options accessed through the arrow next to the sort hyperlink at the top right corner of the grid.
Recommendation: Test restricting user access in a non-Production environment to ensure the auditor can see what they should and cannot see what they should not.
After the Inspection is Complete
Remember to deactivate and remove regulatory auditor users after the inspection is complete. To Edit or Delete a User Restriction, select the action menu next to that restriction on the Manage User Restrictions page.
How to “Narrow Choices” With Facets
The Narrow Choices panel, located on the left side of the Study Items List, Inbox, and Work Area, allows you to find items based on specific qualities. These qualities are called facets. If you want to hide the Narrow Choices Panel to get a bigger view of the items list, the Narrow Choices panel can be expanded or collapsed by selecting the Show Filters (>) or Hide Filters (<) button.
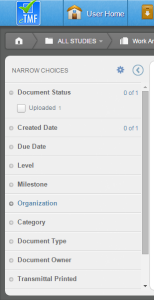
How to Use Facets
To filter down the displayed items, select the square box next to a facet in the Narrow Choices panel. Selecting a facet will automatically update the items found in the center panel. The number next to each facet indicates the number of documents that apply to that facet.
To remove the filter, either deselect the box next to the facet or select the X next to the filter at the top of the center panel. The filters can also be cleared by selecting the actions gear at the top of the Narrow Choices panel and selecting Clear Filters.
You can select multiple facets in order to further refine the search. When multiple facets are selected only documents that satisfy both facets will be displayed.
To better see different types of facets, categories can be collapsed or expanded by selecting the (+) or (–) symbol next to each facet.
Saving Facets
You can save a specific facet or group of facets by selecting the gear at the top of the Narrow Choices panel and selecting “Save” or “Save As”. Once you enter a name for the filter, the filter will be displayed under the action menu (gear).
To remove a saved filter from the Saved Filters list, select the X next to the filter.
See Also: Facet Picker
Auditor user accounts have access to stripped-down versions of the following pages:
Documents that are Authored within the eTMF can be Shared with other users. Sharing a document gives the Recipient permission to Check-in and Check-out a document to edit it.
To share a document that was Authored within the eTMF, select the Actions Menu associated with the document and select Share Document.
From the Share Document window, enter a Recipient into the Name or email address field. Multiple Recipients can be added to the Share list. To remove a Recipient from the list, select the X next to that Recipient. When the appropriate Recipients have been selected, click Apply.
The document will be displayed in your Work Area as well as the Recipient’s Work Area.
Removing a document that has been Shared will remove it from the Recipient’s Work Area as well.
If a Transmittal is lost before it can be used, follow these steps to re-generate it :
- Go to your Work Area.
- Select Expected in the Document Status section of the “Narrow Choices” panel.
- Use the remaining “Narrow Choices” options to find the Expected Document that matches the transmittal you need to re-print.
- Click the gear icon for the Expected Document that matches the transmittal you need to re-print.
- Select Generate Transmittal.
The transmittal will be generated and downloaded in your browser.
NOTE: If you change any metadata on the expected document, any existing transmittals for that expected document are no longer valid and must be re-printed.
