![]()
Tag Archives: 2.4
Standard Reports
The eTMF Standard Reports page provides easy access to four Standard Reports.
Users with appropriate permissions can view the eTMF Standard Reports page by clicking Metrics in the Top Bar, clicking the Metrics & Reports button, and clicking Standard Reports in the dropdown menu. This will display the list of Standard Reports with a description of the reports next to them.
To generate a report, double click on the type of report you would like to generate. This will display the Report Criteria screen where you can select filters for your report. When you have selected the appropriate filters, click Generate Report. For more information about report options, see Saving, Exporting and Sharing Reports.
Translation
Some Documents need to be Translated into the language of the users who will be coming into contact with them. Document types can be defined to have the Translation Type attribute associated with them.
If a document is defined to have the Translation Type attribute, Translation Type will appear as Metadata when working with that document type. This means when selecting that document type in a wizard, add item, or add event screen, the user will have the ability to select a Translation Type from a list of values defined in the eTMF. This also means if you are Indexing a document and proposing a new study item, you will have the ability to select a Translation Type from a list of values defined in the eTMF. The value selected for Translation Type will appear in the name of the study item or document.
How Are Completeness, Timeliness and Quality Calculated?
1. Completeness Report
The completeness report is based upon the current date. If you run the report on July 15th, the report looks at all study item placeholders whose due date is < the current date. Completed study items, from that total set of study items, is based upon any of those that have an activation date (this handles either fulfilled by reason or a document).
1.1. Example:
If you have the following placeholders:
| Placeholder | Due Date | Activation Date |
| 1 | 05-Jun-2013 | 12-Jun-2013 |
| 2 | 05-Jun-2013 | |
| 3 | 12-Jul-2013 | |
| 4 | 12-Jul-2013 | 05-Jul-2013 |
| 5 | 23-Jul-2013 | |
| 6 | ||
| 7 | 12-Jun-2013 | |
| 8 | 23-Jun-2013 | 08-Jul-2013 |
They are evaluated as follows:
- Placeholder 1 is included in the calculation and is considered complete.
- Placeholder 2 is included in the calculation and is considered NOT complete.
- Placeholder 3 is included in the calculation and is considered NOT complete.
- Placeholder 4 is included in the calculation and is considered complete.
- Placeholder 5 is not included in the calculation because the due date is not before the current date.
- Placeholder 6 is not included in the calculation because it does not have a due date.
- Placeholder 7 is not included in the calculation because it does not have a due date.
- Placeholder 8 is included in the calculation and is considered complete.
The calculation for the completeness report is: 3 completed / 5 total = 60%
1.2. Historical Completeness
For the historical completeness metric, the evaluation for a month is based upon the completeness as of the first of the next month. So for the calculation for a month like Jun 2013, it is based upon looking at completeness as of July 1. The total set of study items are those whose due date is < the date (July 1st). The completed set of study items are taken from that set which have an activation date < the date (July 1st).
If we evaluate the same set of placeholders for the historical month of June, they are evaluated as follows:
- Placeholder 1 is included in the calculation and is considered complete.
- Placeholder 2 is included in the calculation and is considered NOT complete.
- Placeholder 3 is not included in the calculation because the due date is not before July 1st.
- Placeholder 4 is not included in the calculation because the due date is not before July 1st.
- Placeholder 5 is not included in the calculation because the due date is not before July 1st.
- Placeholder 6 is not included in the calculation because it does not have a due date.
- Placeholder 7 is not included in the calculation because it does not have a due date.
- Placeholder 8 is included in the calculation and is considered NOT complete because the activation date is not before July 1st.
So the historical completeness percent for June is: 1 completed / 3 total = 33.33%
Note 1: Remember that Due Dates can change for a study item. So let’s say you looked at the historical completeness above based upon the above data, and then the milestone date associated with Placeholder 8 is changed (or an actual date is provided which is different from the planned date). This change to the milestone changes the due date for Placeholder 8 to be 02-Jul-2013. If you go after that and look at the historical completeness – placeholder 8 is no longer included in the calculation and the historical completeness calculation for June changes to: 1 completed / 2 total = 50%.
Note 2: Remember that a study item can be deactivated and re-activated at a later date. So let’s say you take the original historical data above and you deactivate Placeholder 1 and you re-activate the placeholder on 03-Jul-2013. If you go back and look at the historical completeness for June, Placeholder 1 is still included in the completeness, but is no longer considered complete as of 01-Jul-2013. Therefor the historical completeness for June changes to: 0 completed / 3 total = 0%
2. Quality Report
Data for the Quality Report comes from the first time a document was processed through QC during the specified timeframe. Quality is based on the percentage of QC tasks resulting in documents being activated, as opposed to returning for QC rework.
Documents that are Finalized on the first time they go through QC count as “Passed”.
Documents that are sent for rework the first time they go through QC count as “Failed”.
The Document Quality metric is the percentage of documents that did not fail the QC task out of the total number of documents that were processed through the QC task for the first time in the given time frame.
As of eTMF 2.2, the Quality Report excludes documents authored within the eTMF.
3. Timeliness Report
Timeliness Report is based on the percentage of documents that have been processed within a specified number of days after receipt. The Timeliness report is useful for understanding how long it is taking to process documents through the QC Workflow.
A business administrator can configure the number of days that a document can take from Receipt to Finalization and be counted as “On Time”. Changing this configuration after documents are finalized has no effect on the timeliness of those documents.
The value shown in Timeliness Report is the number of documents finalized “On Time”, divided by the number of documents finalized during the reporting timeframe.
Workflow Edit/Manage Workflow
Users with appropriate permissions can Edit and Manage the Workflow for an item that is In Review or in Approval. To Edit and Manage the Workflow, select the Actions Menu associated with an Item that is In Review or Approval and select Manage Workflow.
To add a Recipient for Review, Select +Add Recipient, enter the Recipient’s username into the Select a Recipient field, and select a Signature Reason from the Select signature reason field dropdown arrow. Selecting OK will add the Recipient to the Approver List below.
Note: You can’t add more than the Maximum number of Recipients for that Workflow Task.
To Delete or Reassign an Approver from the item, Select that user in the Approver List and select Delete or Reassign. Selecting Reassign will add that user’s data into the Review fields so that you can change them. Selecting Delete will remove the user from the list.
Note: Tasks Recipients who have completed their step in the Workflow cannot be Deleted or Reassigned.
Note: It is not possible to Delete a Recipient that would take the number of Recipients below the minimum number of Recipients for that Workflow Task.
If the Workflow has multiple steps in the Review or Approval process, the step that you are viewing in the window can be changed by selecting another task on the left side of the window.
When the appropriate changes have been made to the Workflow, select Save to save the changes. The Manage Workflow window will automatically close.
To exit the Manage Workflow window without saving any changes, select Cancel. The Manage Workflow window will automatically close.
Canceling the Workflow
To Cancel the Workflow, select Cancel Workflow in the bottom left corner of the Manage Workflow window. A warning message will display asking if you are sure that you wish to Cancel the Workflow. Clicking Ok on the warning message will Cancel the Workflow and the Document will return to Draft status.
Workflow Initiation
To begin a Workflow Initiation, select the Actions Menu on a Document in Draft status and select Send for Review or Send for Approval.
Steps to Initiate a Review Workflow
Note: to initiate a Review Workflow the document must be checked in, completely Indexed, and in Draft status.
After selecting Send for Review…
You are able to start the workflow within the eTMF or indicate the review occurred outside the eTMF. Select from a list of one and two stage review workflows configured for the specific document type (or all applicable document types).
Enter a list of reviewers based on workflow configuration.
Select a purpose / meaning for review for each selected reviewer.
To allow the reviewers to delegate the task, select Allow Delegation.
Optional: Add a message for the recipients in the Message to Recipients field.
Select a Due Date and time for that step of the Task. The date can be changed by selecting the Calendar icon and the Time can be changed by selecting the Clock icon.
If the Workflow has multiple steps, select Next and repeat the previous steps. If the Workflow has one step, select Finish to begin the Workflow.
Steps to Initiate an Approval Workflow
Note: to initiate an Approval Workflow the document must be checked in and all required metadata must be entered.
Select users and the meaning of their approval.
Indicate if users are allowed to delegate this task.
Optional: add a message to recipients in the Message to Recipients field.
Select a Due Date and time for that step of the Task. The date can be changed by selecting the Calendar icon and the Time can be changed by selecting the Clock icon.
When you are ready to begin the Approval Workflow, select Finish.
Create and Update Document Templates
Templates are created from files on your file system, although they can be edited within the eTMF after creation. To start the creation process, locate a file you want to use as a template on the file system. To create a new Document Template in eTMF, select the Actions Menu on the Document Templates List Page and select Create New Template.
Steps for Creating a New Document Template
Begin by entering a Name for your new Template.
Select a language for the Template by selecting the dropdown arrow on the right side of the Language field.
Optional: Enter any Notes on Usage that may be helpful to the user.
If the Template will apply to all Document Types, Select Yes under Applies to All Types.
If the Template will not apply to all Document Types, Select No under Applies to All Types and click Select Document Types. This will display the Select Document Types window. In this window, select one or more document types for which the template should be available.
Finally, select Browse under Template File to choose the Template. Once the Template has been picked and the information in all of the previous fields is correct, select Create. The new Template will now display in the Templates List.
Study Metrics
Study Metrics is a data-table overview of the progress of studies with filtering to let you focus on specific areas and drill down into more detail.
Study Metrics are available to all Administrators and Study Owners.
Aggregating
When the Aggregate By is set to Study, you can double-click on a Study or right-click and select View Study to see more detailed statistics for the selected study.
Note: “Aggregate by” must be set to “Study” to see study-specific statistics.
The Study Metrics Groups page shows a breakdown of metrics for a single study.
By default, the counts of study items are displayed for the selected study, grouped by Functional Line.
Aggregating Single Study Metrics
The counts of study items can be aggregated by different values by changing the Aggregate By drop-down.
Changing the Study in Single Study Metrics
To see single-study metrics for a different study, use the Study drop-down, shown below.
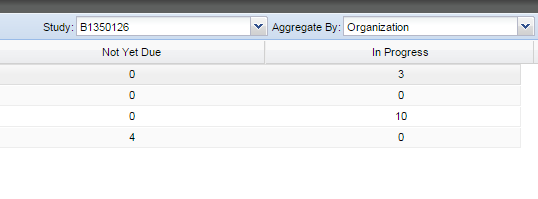
Getting Specific Documents from Single Study Metrics
You can double-click on a row of aggregated values or right-click on a row and select View Study Items to see the actual list of study items based upon the particular Aggregate By value.
Exporting
You can export these to Excel with Actions -> Export to Excel
Understanding Expiration Dates
If the Document Type is flagged as a document type which expires, then you will see the following:
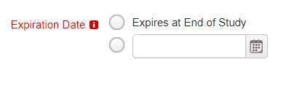
If the document expires, an expiration date can be entered. If the document does not expire, the checkbox should be selected. Once the document is finalized, if an expiration date is entered, a duplicate study item will be created with a due date set to the expiration date of the document.
Relationships
To view the relationships of a study item, select the actions menu next to the item on the Study Item List page and select Related Study Items.
Note: The Related Study Items option will only be present if the study item has relationships.
The Related Study Items window will be displayed. This window includes information about the Item(s) that are related to the study item.
The Related Study Items window is most useful for quickly identifying which items are related and seeing their metadata.
