Tag Archives: 2.5

Study Lock

A study can be locked as a way to both prevent the study from modification and prepare it for archiving. Locking a study inhibits a user from making any changes for a study, including: Uploading content, deleting study items, fulfilling study items, obsoleting study items, and running wizards for the study that is locked. Users with Check Lock Preparedness permission can lock a study.

Review the Lock Readiness Report

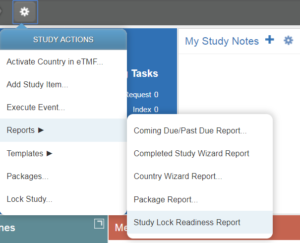
Before locking a study, review the Lock Readiness report. Generate the report by executing the following steps:

  1. Navigate to the Study Home page of the study you want to lock.
  2. Click on the Actions menu icon and select Reports >Study Lock Readiness Report.

The report downloads to either your default download location or to a location you specify. The exact behavior is based on the browser used.

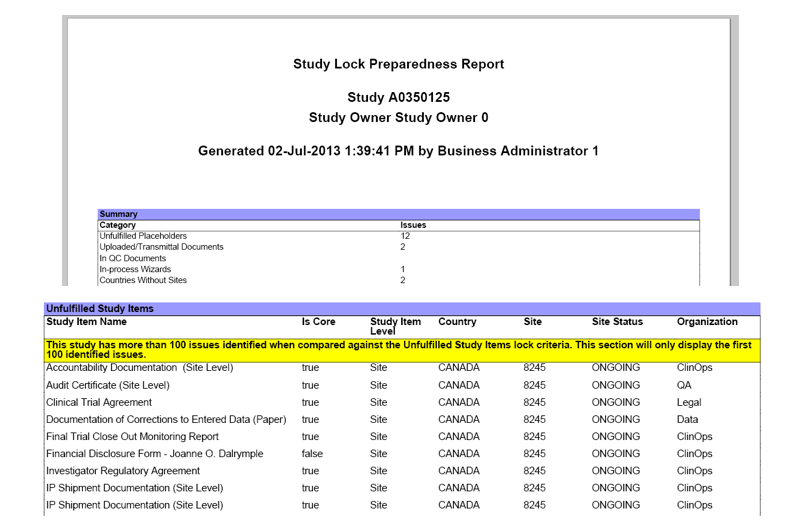
The report contains a summary page that displays counts of issues in the following categories:

  • Unfulfilled Study Items
  • Documents in Work Area
  • Documents in Workflow
  • In-process Wizards
  • Countries with No Sites
  • Sites not in TMF
  • Unaddressed Acknowledgements

The report also shows the breakdown of issues within each category.

Complete all required and desired remediation

If there are issues outlined in the Study Lock Readiness Report, complete all required and recommended remediation based on the following guidance:

IssueActionMust be Addressed?
Unfulfilled Study ItemsDetermine why they are empty and perform one of the following options:
* Obtain Content
* Mark as Fulfilled without Content
* Delete
No
Uploaded/Transmittal DocumentsDetermine if content is needed.
* If not needed, delete using Advanced Search
* If needed, contact contributors to release the documents to QC
Yes
In QC DocumentsContact task owners to expedite the completion of tasks.Yes
In-Process WizardsDetermine if the wizard needs to be finished and if the resulting content is needed in the eTMF
* If needed, complete the wizard and address missing documents
* If not, delete the wizard
Yes
Countries Without SitesDetermine if content is needed for sites
* If it is not needed, no action is necessary
* If it is necessary, complete the site wizard(s) and address the missing documents
No
CTMS Sites Not in the TMFDetermine if content is needed for the sites
* If not needed, no action is necessary
* If it is needed, complete the site wizard(s) and address missing documents
No

All essential issues must be addressed in order to lock the study.

Lock Study

To lock the study, navigate to the Study Home page of the study you want to lock. Click on the Actions menu icon and select “Lock Study.”

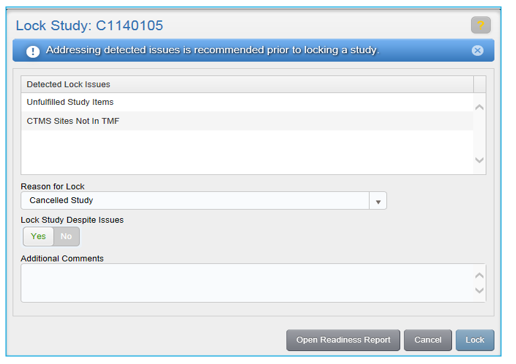
If the required criteria for locking has not been met, a warning message will display, stating that you must review the Lock Readiness Report and fulfill all criteria before you can lock the study. Click Open Readiness Report to view the report immediately or Cancel to generate the report at a later time.

If only non-essential issues remain, you can proceed with locking the study by acknowledging that you are aware of the issues and providing a reason for the lock. Select a reason from the Reason for Lock drop-down, and select “Yes” in the Lock Study Despite Issues field. Enter any Additional Comments you might have and click Lock.

Unlock a Study

Once a study has been locked, it can be unlocked if you need to add additional study items or fulfill study items. To unlock a study, you must have Study Unlock permission.

  1. Navigate to the Study Home page of the study you want to lock.
  2. Click on the Actions menu icon and select “Unlock Study.”
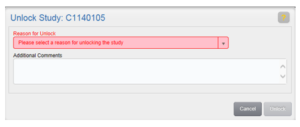
  3. Select a Reason for Unlock, enter Additional Comments if necessary, and click Unlock.

View Versions of Document Templates, Workflow Definitions, or Workflow Task Definitions

To View the Version History for any Document Templates, Workflow Definitions, or Workflow Task Definitions, access the Actions menu associated with the object and select “View Versions.”

The View Versions window will display the previous versions of the configuration and their metadata. Each version has its own Actions menu that allows you to:

  • View Native Content (if not PDF)
  • View PDF in Acrobat
  • View PDF in Browser
  • View metadata

If the Configuration has multiple pages of Versions, the pages of Versions can be changed by selecting the arrows at the bottom of the View Versions window.

Authoring New Document from Template

You can author a document within eTMF. When documents are authored in eTMF, the user has the ability to check out the content while in Draft status, make changes, and upload the changes to the system. The user also has the ability to share authoring responsibilities with another user.

To finalize an authored document, it must be sent through an approval workflow (which may or may not be an eSignature workflow).

To author a document, navigate to your Work Area and click the Author Document button (the rightmost button). Or, from the Actions menu of an unfulfilled Study Item, select “Author New Content.”

Differences in the Two Ways to Author a New Document

Author Document Button (Work Area)

  • Used if study item does not already existing on the study item list
  • Must select the study to which the content belongs and, if you need to propose a new study item, select a document type from the master list
  • Able to create content for enterprise or program level documents
  • Able to select from list of applicable templates or import content

Author New Content (Unfulfilled Study Item)

  • Used if study Item already exists on the Study Items List
  • Allows for minimal Indexing
  • Not available for Enterprise or Program level documents
  • Able to select from list of applicable templates or import content

Authoring a New Document From a Template or by Importing Content

Using either of the methods above, you must choose the base content file. This file can be chosen from a list of existing document templates in the system or by importing an existing file.

Use a Document Template

A document template is typically used when the content does not yet exist. The template serves as the starting point to create the content of the document.

Note: Document templates are configured by Business Administrators and can be of any eTMF acceptable file type.

When you choose to author content, the list of document templates you can select from is limited to those applicable for the document type of the study item. You can limit the list by a specific language using the Template Language drop-down. If limiting by language, you can also select the adjacent check box to include English language templates in addition to those for the selected language.

Once a template has been selected, click Create. This will add the document to your Work Area where you can continue authoring it by checking it out to your local machine.

Import a File

To import a document that has been partially authored outside the eTMF, click Import Document. This will display the Upload to Study Item screen. Click Select File, navigate to and double-click on the file you want to upload, and click Upload. The will add the document to your Work Area where you can continue authoring it by checking it out to your local machine.

Make Obsolete and Retire All Items

The eTMF allows a Study Owner to make study items that were activated with incorrect metadata/content or that are no longer needed obsolete. Study items can be made obsolete individually or in bulk.

To make all items in a list obsolete and retire them, access the list view’s Actions menu and select “Make Obsolete and Retire All Items. ” If your list contains more than 50 items, a message is displayed, stating that the action will be performed on the first 50 items. You will need to repeat the action on additional items. Click OK to continue.

The Make Obsolete and Retire All Items screen lists all items within your list that the system is able to obsolete. If any items from the list cannot be obsoleted (e.g., items in the list are not final or you do not have permission to obsolete them), a message is displayed along the top of the screen.

On the Make Obsolete and Retire All Items screen, select a Reason and enter any Comments you might have. Deselect the check box for any study items you do not want to make obsolete. Click Obsolete and Retire Selected. The document status will be updated to Obsolete.

Disassociate Program Document

Use this process to remove the association between a Study and a Program Level Document (e.g., if the wrong document type was selected or the document does not apply to the study).

  1. Navigate to the program level study item in the study item list.
  2. Select “Disassociate Program Document” from the associated Actions menu.
  3. Select a Reason for Disassociation.
  4. Enter any Additional Comments if necessary.
  5. Click DisassociateThe study item will no longer appear as Final and fulfilled.

Disassociate Enterprise Document

Use this process to remove the association between a Study and a Enterprise Level Document (e.g., if you chose the incorrect document type or the document does not apply to the study).

  1. Navigate to a Final enterprise level document in the study item list. 
  2. Select “Disassociate Enterprise Document” from the associated Actions menu. 
  3. Select a Reason for Disassociation.
  4. Enter any additional comments if necessary.
  5. Click DisassociateThe study item will no longer appear as Final and fulfilled.

Associate Program Document

A Study Owner is responsible for associating finalized program level documents with the appropriate study items across studies. Once associated, the study item is Fulfilled.

To associate a Program Level Document  to a Study Item:

  1. Navigate to the study item list for a study.
  2. Locate the program level study item. You can use the Level facet on the Narrow Choices panel to limit the study item list to those items that are solely program level.
  3. Select “Associate Program Document” from the study item’s Actions menu. NOTE: The “Associate Program Document” option will only appear if a program level study item has been selected.
  4. On the Associate Program Document screen, Final documents that match the document type of the study item are listed. Select the check box for the appropriate document and click Associate.

The study item will appear as final and fulfilled.

Note: If no documents are displayed in the Associate Program Document window, no documents match the document type of the selected study item.

Associate Enterprise Document

A Study Owner is responsible for associating finalized enterprise level documents with study items in the appropriate studies. Once associated, the study item status is Fulfilled.

To associate an Enterprise Level Document to a Study Item:

  1. Navigate to the study item list for a study.
  2. Locate an enterprise level study item. You can use the Level facet on the Narrow Choices panel to limit the study item list to those items that are solely enterprise level.
  3. Select “Associate Enterprise Document” from the study item’s Actions menu, as shown  below.
  4. NOTE: The “Associate Enterprise Document” option will only appear if an enterprise level study item has been selected.
  5. On the Associate Enterprise Document screen, Final documents that match the document type of the study item are listed. Select the check box for the appropriate document and click Associate.

The study item will appear as final and fulfilled.

Note: If no documents are displayed in the Associate Enterprise Document window, no documents match the document type of the selected study item.

Program and Enterprise Documents

Use a Program Level Document or Enterprise Level Document  when studies need to reference documents not created specifically for that study. Program documents are documents associated with multiple clinical studies for a given program. For example, the Investigator Brochure generally applies to all ongoing studies for a program, as do certain safety documents. Enterprise documents are documents not associated with any clinical program. For example, validation documents are needed for systems such as IVRS and EDC applications, but these systems may be used for a number of clinical programs.

Both of these types of documents are stored once in a specific area of eTMF and then associated with study-specific Study Items. They are not copied but instead are linked to the Study Items. If study items for a study include enterprise or program documents, the Study Owner is responsible for linking the documents to the appropriate study items.

NOTE: The enterprise/program level is specified for a document type in the master list. Permissions to create program and enterprise documents vary by organization.

Viewing Program and Enterprise Documents

To view Program and Enterprise documents, select the “View Program/Enterprise Documents” option from the More menu in the primary navigation header.

The Program/Enterprise Documents page displays all program and enterprise documents. Study Owners will see documents for the programs to which their studies belong; non-Study Owners will see only documents that are actually associated with their studies.

You can only view Program and Enterprise documents from this page. See Associating Program Level DocumentsAssociating Enterprise Level Documents, Disassociate Program Document, or Disassociate Enterprise Document for details.

Distribute Documents

Users in the Distribute Documents group can Distribute Program Level Documents (such as safety reports) to sites for document types that are marked as Distributable in the eTMF. The document must be Final before it can be distributed. You can choose specific sites to which the document should be distributed.

Distributing a document results in two actions:

  • Linking of the document into each study for which a site was chosen (unless it has already been linked into that study). After linking, the Program level document will appear in the Study Item list for the study.
  • Creating a record in the Audit Trail of when the document was distributed to the site

How to Distribute a Document

To distribute a document, select the “Distribute Document” option on the document’s Actions menu. On the Distribute Document screen, select which sites the document will be distributed to.

  • The document can be distributed to any or all sites for studies associated with its Program that are not locked or archived
  • The grid will not display sites to which the document has already been distributed
  • Use the filters on the left hand side of the dialog to select sites for only specific studies or countries, or to eliminate sites based on their status or most recent milestone
  • To select all displayed sites, select the box above the grid

When the appropriate sites have been selected, click Distribute. You can distribute the document multiple times based on different conditions. Close the dialog when done.

You can generate a distribution report to view distribution information in an Excel file that can be downloaded from the Downloads page.  If the document has been acknowledged by the site, the name of the person who acknowledged the document will display in the report, as well as the date of acknowledgement.

Note that all sites will display in the report, but only the sites selected to receive the document will show a distribution date.

image_pdf