Select a study from the Studies breadcrumb menu. The Studies breadcrumb menu provides categories for Favorites and Recent studies, as well as the option to browse a list of More Studies you have access to.
(Optional) If uploading documents at the country or site level, select a country (or a country and site) from the corresponding breadcrumb menus.
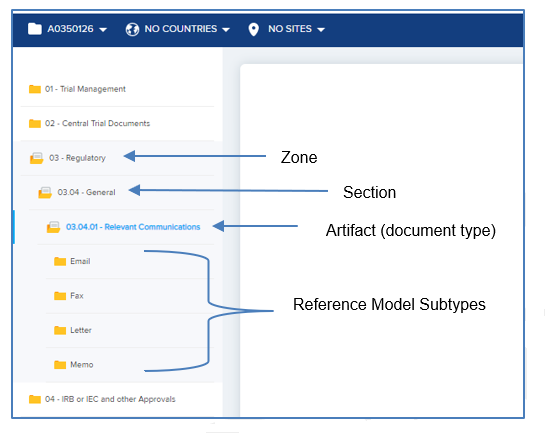
Once a study is selected from the breadcrumb (or a
study/country or study/country/site combination), the left panel updates to
display the TMF Reference Model folder structure. Expand a zone folder to
display folders for each section in the zone; expand a section folder to display
folders for each artifact in the section; and, if reference model subtypes are available
for the artifact, expand an artifact folder to see folders for each reference
model subtype.
Note: The only folders displayed in the tree are those with an eUpload eligible document type. For example, if there are no eUpload eligible document types associated with a Reference Model ID in zone 06, then a Zone 06 folder will not be displayed.
You can upload to an artifact folder or (if available) to a
reference model subtype folder. If reference model subtypes are required for a
specific artifact, you can upload only to a reference model subtype folder. When
you select a folder that allows you to upload, one or more upload locations (i.e.,
drop zones) are displayed in the middle of the page, as described in the
following section.
Before uploading, you must select a study from the breadcrumb menu (country and site are optional) and a TMF Reference Model folder for an artifact or reference model subtype. These selections determine the document type to associate with the documents you upload.
Once you select a folder that allows you to upload, one or more upload locations (i.e., drop zones) are displayed in the middle of the page. In addition, if there are any existing study items associated with the selected level and folder, the study items are displayed below the drop zones. You can upload to either of these locations.
eUpload Workflow settings
determine which documents in eUpload can be submitted and how submitted
documents are handled.
Documents with
complete metadata can always be submitted. In the eUpload Workflow settings,
you can specify the workflow path for these documents. Documents with complete
metadata can be directed to a QC task or to finalization.
By default, documents
with incomplete metadata can also be submitted. These documents will remain in
the user’s eTMF Work Area after submission for further indexing.
Users in the TMF Manage eUpload Settings feature group
can change the default settings to:
Prevent submission of documents with incomplete
metadata
Change the destination for documents with in
complete metadata
Change the destination for documents with
complete metadata
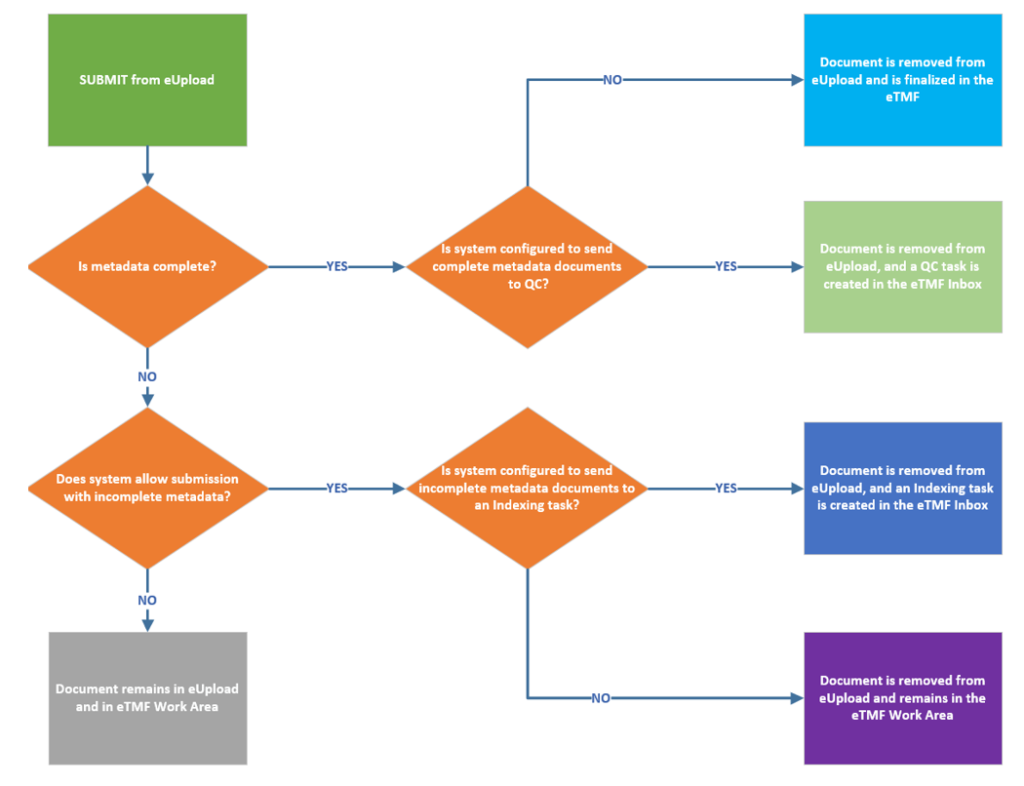
The diagram below illustrates the possible workflow setting configurations and how they affect the handling of documents submitted from eUpload.
If you are a member of
the TMF Manage eUpload Settings
group and you want to change the default eUpload Settings, follow the steps
below.
From the More Menu in eTMF, select Administration.
Select eUpload Workflow from the Administration menu.
Complete the following fields.
The Can submit with incomplete metadata field determines if eUpload documents that are not completely indexed can be submitted. By default, this check box is selected, meaning that documents can be submitted even if one or more required fields are missing values. If you want to require eUpload users to fill in all metadata fields before being able to submit, deselect the check box.
The Destination for incomplete metadata field is valid only if the Can submit with incomplete metadata check box was selected, and it determines the destination for documents that are submitted when they do NOT have values in all required fields. By default, “Work Area” is selected, meaning that documents with incomplete metadata will remain in the user’s eTMF Work Area upon submission. If you want documents with incomplete metadata to be sent to an Indexing task upon submission, select “Indexing” from the drop-down.
The Destination for complete metadata field determines the destination for documents that are submitted with all required fields completed. By default, “QC” is selected, meaning that documents with values in all required fields will be sent to a QC task upon submission. If you want documents with all required fields completed to be finalized upon submission, select “Finalization” from the drop-down.
Only ad hoc document types can be used in eUpload.
Ad hoc document types
must be configured in a specific way to be available in eUpload. An ad hoc document
type will be available in eUpload if it:
Does not have any additional attributes, OR has only the additional attributes of “Subject” and/or “Ref Model Subtype”
Has the eUpload Item Type setting of “Correspondence” or “Other”
Is at the study, country, or site level
Important: There can only be one ad hoc document type with an eUpload Item Type setting of “Correspondence” or “Other” for a specific TMF Reference Model ID and level.
To alter the configuration of existing document types:
From the More Menu in eTMF, select Administration.
Select Master List Maintenance from the Administration Menu.
On the Master List Manager, use filters as needed to locate a specific ad hoc document type.
To filter the items in the master list, click the down arrow on a column header. Hover on Filters to display a filter field. Enter text or select a filter value as appropriate. For example, click the down arrow on the Is Ad Hoc column header, hover on Filters, and select the Yes check box to narrow down the list of document types to ad hoc only.
To sort the items in the master list, click once on the column header to sort values in ascending order. Click again to sort values in descending order.
Double-click on a document type to pen the TMF Item Editor.
Scroll down to the Additional Attributes grid. Ensure that there are not additional attributes other than Subject and/or Reference Model Subtype. Both are optional.
Locate the eUpload Item Type field. This field is visible only if Is Ad-hoc is set to “Yes.”
In the eUpload Item Type field, click the down arrow and select either “Correspondence” or “Other” from the drop-down. Note: Selecting either “Correspondence” or “Other” will enable the document type for use in eUpload. The specific value chosen does not have any bearing on functionality currently but may be used in the future for filtering or some other purpose.
Click Save at the top of the TMF Item Editor. If another document type in the master list is associated with the same Ref Model ID and level, the system will display an error. Otherwise, the Reason for Change dialog appears.
Click the down arrow in the Reason field to select one or more reasons for the change.
(Optional) Enter additional comments about the change in the Reason Notes field.
Users who need access to eUpload must be added to the TMF eUpload Users feature group. TMF Contributors group, System Administrators, and Wingspan Support Personnel are added to this group by default, but you can add additional users at your discretion.
From the More menu on the User Home Page, select View eTMF Configurations.
Select Groups & Roles from the breadcrumb menu.
On the Groups & Roles page, enter “eUpload” in the Search field to search for the TMF eUpload Users group.
Select the TMF eUpload Users hyperlink from the search results to access the Edit Group dialog.
To provide one or more individual users with access to eUpload, scroll down to the Member Users field and click Select Users. On the Select Users dialog, select the checkbox for each user you want to add as a member. Use the Search field on the left to search for a specific user using text or use the filter fields to narrow down the list of users using available criteria. Click Apply.
To provide one or more groups with access to eUpload, scroll down to the Member Groups field and click Select Groups.
On the Groups & Roles dialog, select the check box for each group you want to add as a member. Use the Search field on the left to search for a specific group using text or the filter fields to narrow down the list of groups using available criteria.
Click Apply.
Select Save on the Edit Group dialog.
Members of the TMF eUpload
Users group will have access to the same studies in eUpload as they have access
to in eTMF.
eUpload is a tool that can be used in conjunction with eTMF for expedited upload and processing of ad hoc documents. eUpload provides the following, primary features:
Ability to upload files individually or in
batches
Automatic indexing of uploaded documents to ad
hoc document types
Thread matching and metadata extraction from
Outlook .msg files
Ability to review uploaded files and specify missing
metadata
One-click submission with configurable
submission routes (e.g., Work Area or Indexing task for additional indexing, QC
or finalization for documents with complete metadata)
eUpload allows you to
upload files from your local machine to a selected study (country and site are
optional) and TMF Reference Model folder. Based on these selections, the system
automatically indexes each document uploaded to the appropriate document type
and level and creates the associated study item(s). If an ad hoc study item
already exists for the selected study/country/site level and TMF Reference
Model folder, you can upload a document directly to that study item as a newer
version. Uploaded documents are immediately available for review both in eUpload
and in the user’s eTMF Work Area.
During the upload, special
handling is provided for Outlook .msg files, automating several steps of the
process and adding to your overall time savings. Key metadata such as Subject
(if applicable), Document Date, Receipt Date, and Language are automatically
extracted from the file and used to populate the corresponding fields on the
document. In addition, thread identification is used to match the uploaded
content to existing email threads in the study, eliminating unnecessary duplication.
eUpload provides a simplified
review screen that allows you to ensure that the appropriate documents were
uploaded and to fill in missing metadata before submitting them. Documents can
be reviewed and submitted on an individual basis, or you can skip the review
altogether and submit all documents at once.
The act of submitting
a document removes the document from eUpload and may also update its lifecycle
state in eTMF, based on the completeness of the document’s metadata and on system
configuration settings. For example, eUpload can be configured to send documents
requiring further indexing to an Indexing task upon submission instead of
keeping them in the user’s Work Area, based on your organization’s practices.
Configuration settings also determine whether documents that are completely
indexed at the time of submission are sent to QC or finalized.