Tag Archives: 2.6

Closing a File Review

A File Review can be closed to prevent further actions within it.

Prerequisites: To close a File Review, you must have VIEW_FILE_REVIEWS permission and you must be a member of a Review Manager Group for the template on which the File Review was based. In addition, all Review Items must have a status of Review Completed or In Progress, AIs Addressed.

  1. Navigate to the Study Item List of the study for the File Review.
  2. From the Study Items Breadcrumb Menu, select “File Reviews.” The File Reviews List Page is displayed.
  3. Locate the File Review you want to work with within the list and select the name hyperlink. The File Review Items List Page is displayed.
  4. Select the gear icon above the list and select “Close File Review” from the Actions Menu. If there are Addressed action items in the File Review that haven’t yet been closed, you’ll be asked to confirm your intention to close.

The status of the File Review changes to Closed.

If further actions are needed within a closed File Review, the File Review can be reopened.

Reopening a File Review

A File Review that has been closed can be reopened if further actions are needed.

Prerequisites: To reopen a closed File Review, you must have VIEW_FILE_REVIEWS permission and you must be a member of a Review Manager Group for the template on which the File Review was based.

  1. Navigate to the Study Item List of the study for the File Review.
  2. From the Study Items Breadcrumb Menu, select “File Reviews.” The File Reviews List Page is displayed.
  3. Locate the File Review you want to work with within the list and select the name hyperlink. The File Review Items List Page is displayed.
  4. Select the gear icon above the list and select “Reopen File Review” from the Actions Menu.

The status of the File Review changes to Open.

Deleting a File Review

A File Review can be deleted if the review has been postponed or is no longer valid.

Prerequisites: To delete a File Review, you must be a member of the TMF Delete File Reviews feature group and you must be a member of a Review Manager Group for the template on which the File Review was based. In addition, only open File Reviews can be deleted.

  1. Navigate to the Study Item List of the study for the File Review.
  2. From the Study Items Breadcrumb Menu, select “File Reviews.” The File Reviews List Page is displayed.
  3. Locate the File Review you want to work with within the list and select the name hyperlink. The File Review Items List Page is displayed.
  4. Select the gear icon above the list and select “Delete File Review” from the Actions Menu.
  5. On the confirmation message, select “Ok.”

Reviewing Addressed Action Items

All Action Items that have been addressed in a File Review must be reviewed by the Review Manager to ensure that they were handled correctly.

  1. Navigate to the Study Item List of the study for the File Review.
  2. From the Study Items Breadcrumb Menu, select “File Reviews.” The File Reviews List Page is displayed.
  3. Locate the File Review you want to work with within the list and select the name hyperlink. The File Review Items List Page is displayed.
  4. In the Filters Panel, select the “In Review, AIs Addressed” facet under the Review Item status category to filter the list of Review Items to those with addressed Action Items.
  5. Select the hyperlink for a Review Item to view the details.
  6. Expand the Action Items tab on the right. Review the metadata and comments.
  7. Select one of the following options based on your review:
    • Close –If you think that the Action Item was handled correction, use this option to close the Action Item. If there are no other open Action Items associated with the Review Item, the status of the Review Item changes to Review Completed.
    • Reopen—If you think that the Action Item was not handled correctly, use this option to reopen the Action Item. The Reopen Action Item screen is displayed. Proceed to the next step.
  8. If you chose to reopen the Action Item in the previous step, complete the following sub-steps on the Reopen Action Item screen:
    • In the Reason field, select the appropriate reason from a list of those applicable for the Review Item.
    • In the Recipient field, select a recipient for the workflow task from those listed or enter the name or email address of the desired recipient.
    • In the Issue Category field, select the specific issue. The issues available are based on the Reason.
    • In the Action Item Comment field, enter an explanation or instructions.
    • Select “Save.”


Creating a File Review

A File Review can be created within a study to initiate a secondary review process, such as a sponsor review or a pre-inspection review.

Prerequisites: To create a File Review, you must be a member of the TMF Create File Reviews feature group and you must be a member of a Review Manager Group for at least one File Review Template.

  1. Navigate to the Study Item List of the study for which you want to create the File Review.
  2. From the Study Items Breadcrumb Menu, select “File Reviews.” The File Reviews List Page is displayed.
  3. Select the gear icon above the list and select “Create New File Review” from the Actions Menu. The Create File Review screen appears. If an error message stating that you have exceeded the maximum number of open File Reviews is displayed, contact your System Administrator.
  4. In the File Review Template field, select the template on which the File Review will be based. The list of templates available to you includes those for which you are a member of a Review Manager Group. Once the template is selected, several other fields on the screen automatically fill in.
  5. (Optional) In the Description field, enter a description for the File Review. If entered, the description will be used within the File Review name. Therefore, we recommend entering a short but meaningful description.
  6. The following fields are automatically populated with values from the selected template and are disabled:
    • File Review Template Description
    • Minimum Sampling Percentage
    • Calculated Sample Size Percentage
  7. The Sampling Percentage field displays the sampling percentage that the system will use to determine the number of Study Items included as Review Items. This percentage is the higher of the percentages in the two previous fields (or, if only the Minimum Sampling Percentage field is populated, then that value is displayed here). If you want to specify a different sampling percentage, enter the desire value.
  8. If the File Review is based on a template that limits Review Items based on dates, the Review Start Date and Review End Date fields are enabled. Select the dates that define the range of Study Items to include. For example, if you’re creating a File Review for Quarter 1 2018 documents, enter 01-Jan-2018 as the Review Start Date and 31-Mar-2018 as the Review End Date.
  9. In the Review Manager field, enter the user who is responsible for managing the File Review (i.e., adding or removing Review Items, reviewing Action Items, etc.).
  10. Select “Create.”

The system begins creating the File Review with the appropriate Study Items. When File Review creation is complete, an email is sent to the Review Manager.

File Reviews Overview

File Review provides a tracked and documented secondary QC process in addition to normal document QC.  This process may involve sampled document QC, completeness checks, consistency checks, etc., on a combination of Study Items and Non Document Review Items (e.g., Check for Health Authority Correspondence).  It may be used for periodic review, pre-inspection review, sponsor oversight, review prior to study lock, or other purposes.

Organizations can create File Review Templates which define the rules for a particular type of review.  These include sampling percentages or algorithms, mandatory and excluded Document Types, user roles, rules for review of empty placeholders, and the creation of Non-Document Review Items.

When a File Review is created, eTMF determines which Study Items are in the scope of the review and provides the list of those Study Items on a File Review Items List Page.  Review Participants can access this list and beginning conducting the review on a self-serve basis. As users complete the review, they will either indicate that there are no Action Items or they will create one or more Action Items.  Action Items result in workflow tasks.  When tasks are complete, a Review Manager can review the results and close or re-open the Action Items.

eTMF provides reports and dashboards to monitor and document the File Review process.  When all Action Items have been addressed, the File Review can be closed.

File Reviews – Setup and Configuration

The File Reviews feature must be enabled and several configurations steps performed before File Review-related feature groups, dictionaries, and menu options appear in eTMF.

Enabling the File Reviews Feature

To enable the File Reviews feature, a System Administrator must perform the following steps:

  1. From the More Actions Menu on the User Home Page, select “Administration”.
  2. Select “System Administration” from the Administration Menu.
  3. Select the File Review
  4. Select the File Review Enabled check box.
  5. By default, the maximum number of open File Reviews is set to 5. Change this number in the appropriate field if needed.
  6. Select “Save” from the Actions Menu in the System Administration header.

Once the File Reviews feature is enabled, a Business Administrator or other user with the appropriate access is responsible for certain configuration steps as explained below.

Controlling Access to File Review Menu Items

First, the Business Administrator must assign users to File Review specific feature groups that control access to File Review list pages and menu items. Feature groups specific to File Reviews include:

  • TMF Manage File Review Templates –controls the ability to create and manage File Review Templates
  • TMF Create File Reviews –Controls the ability to create and manage File Reviews and close Action Items*
  • TMF Delete File Reviews – Controls the ability to delete a File Review*
  • TMF View File Reviews—Controls the ability to view File Reviews for a given study*

*Note: Feature groups are used in conjunction with File Review Template settings to control access to specific File Reviews and menu options. For example, to see the option to delete a File Review, the user needs to have TMF Delete File Reviews permission and must be within a Review Manager group for the template on which the File Review is based.

Maintaining Dictionaries

The Business Administrator is also responsible for maintaining dictionaries that control the File Review values available in operations. These dictionaries contain out of the box values that may be applicable to many organizations, but the Business Administrator can also add values that are specific to your organization***. File Review dictionaries include:

Dictionary Meaning of Values Where Used Examples
File Review Types Types of File Reviews that can be performed File Review Template creation Sponsor, Periodic, Pre-inspection
File Review Non Document Review Items Review Items that are not document specific File Review Template creation Check Correspondence, Confirm All Required ICF Translations Filed
File Review Problem Types*** General types of problems found during review Action Item creation Content Issues, Metadata Issues
File Review Issue Category Specific issues that can cause a Review Item to fail Action Item creation Invalid Document, Incorrect Document Date

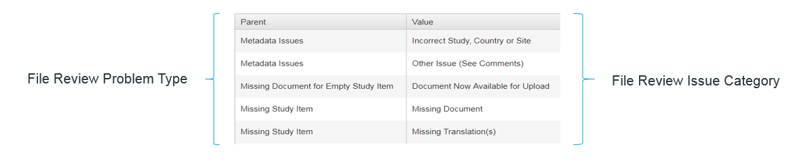
The File Review Problem Types dictionary is a parent to the Issue Categories dictionary, which means that a single Problem Type can correspond to multiple Issue Categories. This relationship is used by eTMF during Action Item creation to control the Issue Categories available by Problem Type.

***Note: File Review Problem Types are built into the system and trigger the creation of specific types of workflow tasks. Therefore, you should not modify the values in this dictionary.

Configuring File Review Templates

The Business Administrator must also configure File Review Templates from which actual File Reviews will be created. File Review Templates define the rules for each type of File Review to be created.

Creating a File Review Template

A File Review Template defines the scope for a specific type of file review, including the types of review items, the sample size, and the users who can view, manage, and participate in the reviews. 

Prerequisites: To create a File Review Template, you must be a member of the TMF Manage File Review Templates group. 

  1. Click More within the global header, then select View eTMF Configurations 
  2. Select the breadcrumb, then select File Review Templates. 
  3. Click the gear icon, then select Create New File Review Template.
  4. Enter your File Review Template information as needed.  
  5. When you’re finished, click Create. 

For more information on template field descriptions, see File Review Template Fields 


File Review Sample Size Calculator

Use sample size parameters to calculate an ideal sample size for File Reviews created from a particular template.

Sample size parameters include the following:

  • Z Score – The Z Score represents your desired level of confidence in the sample size as an adequate representation of the study as a whole. For example, a confidence level of 95% indicates that in repeated File Reviews, the sample size will mimic the entire population 95% of the time. You can find a complete list of Z scores at http://www.z-table.com. Commonly used Z-scores include 1.28 (90% confidence), 1.64 (95% confidence), and 2.32 (99% confidence).
  • Estimated Percentage of Valid Documents – The estimated percentage of valid documents is an estimate of Study Items that typically pass review without issue. This is the benchmark for measuring how accurately the sample size mimics the population. For example, an estimation of 70% indicates that you expect approximately 70% of the sampling to be valid documents. This value is usually based on previous review statistics. eTMF automatically uses an estimate of 50% if no value is available.
  • Margin of Error – The Margin of Error is the amount of error you can tolerate in the sample size. For example, a 3% Margin of Error indicates that you can tolerate only a 3% deviation in the sample size results from the results of the entire population. A smaller Margin of Error generally produces a larger sample size in relation to the population and more accurate results.

For example, suppose you specify a 95% confidence level (Z Score of 1.64), a 50% estimate of valid documents, and a 3% Margin of Error. This means that in repeated File Reviews, the sampling should contain between 47 and 53% valid documents, 95% of the time.

To specify sample size parameters while defining a File Review Template:

  1. Select “Sample Size Parameters” on the Create File Review Template screen. The Sample Size Parameters screen is displayed.
  2. On the Sample Size Parameters screen, select “Yes” in the Use Sample Size Parameters
  3. In the Z Score field, enter the z score that represents the level of confidence you want in the sample size. Acceptable values range between -4.0 and 4.0.
  4. (Optional) Enter an estimated percentage of valid documents in your study(ies). Acceptable values range between 0.0 and 100.0 (for example, enter “70” to specify 70% valid documents). If no value is entered, eTMF uses 50%.
  5. In the Margin of Error field, enter the percentage of error you can tolerate in the sample size. Acceptable values are greater than 0.0 and less than or equal to 100.0.
  6. Select “Save.”

 The system calculates the sample size when the template is used to create a File Review within a specific study. The calculation is shown below:

Sample size = z2 * (p * (1 – p)) / ME2 , where

  • z = Z Score
  • p = Estimation population of valid documents/100
  • ME = Margin of Error/100

Once the calculated sample size has been determined, the system divides the sample size by the total number of Study Items in the study to produce a percentage.

Both the calculated percentage and the fixed percentage from the template are displayed on the screen. The system automatically uses the higher of the two percentages; however, you can override this value if needed. See Create a New File Review for more information.

If the sample size is larger than the number of Study Items in the study, all Study Items that meet other conditions for inclusion will be included as Review Items.

Managing File Review Templates

Users who create File Review Templates can also manage their availability for use from the File Review Templates List Page.

A newly created File Review Template is assigned a Draft status and a minor version number of “.1”. A template with a Draft status can be edited if needed to make changes to the definition. To edit a Draft template, select “Edit Metadata” from the template’s Actions Menu. On the Edit Metadata screen, make changes as desired and select “Save.”

You can make a template in Draft status “effective” to make it available for use in File Review creation. To make a Draft template effective, select “Make Effective” from the template’s Actions Menu. An effective template is assigned the next major version number (e.g., 1.0) Once a template is effective, changes can no longer be made to the template definition. To make changes, you must return to the template to Draft status by selecting “Revise” from the template’s Actions Menu. This action increases the version number by .1 (e.g., 1.1)

If you want to retire the template from use, select “Make Obsolete” from the template’s actions Menu. An obsolete template is not available in File Review Creation, nor can it be edited. An obsolete File Review Templates can be made effective if needed.

image_pdf