If you see a document that is effective but filed incorrectly, email a URL to the document outside of the application:
1. Go to detailed view of the document
2. Copy the URL from the address bar of the web browser
3. Email the URL to the email address of the user who handles these issues
Tag Archives: 2.4
Events
The eTMF will update when trials encounter events such as when:
- An amendment is made to the protocol
- A mistake is detected in how a question was answered in a wizard
- A regulation changes requiring the need to collect a new document in a country for each new PI
- A site is cancelled/terminated
- A natural disaster at an investigator site causes you to be unable to collect some documents
Each eTMF is customized to support your specific business processes.
When to Use Study Events vs. Create Expected Study Item
Executing a Study Event is a response to an occurrence or change to the trial that requires a standard set of documents. Add Study Item is used to add individual documents that were not anticipated or that were added due to changes in regulations, sponsor requirements, etc.
How to Execute Study Events
To add item(s) to a study list based upon the occurrence of an event, use the following steps:
- Navigate to the Study Home Page for the study for which an event has happened.
- Select Actions -> Execute Event
- The Execute Event screen is displayed.

- Select an Event from the drop-down list of events.
The description, instructions, and list of items are updated based upon the event selected.
You should review the instructions to see if any other actions must be taken or considered.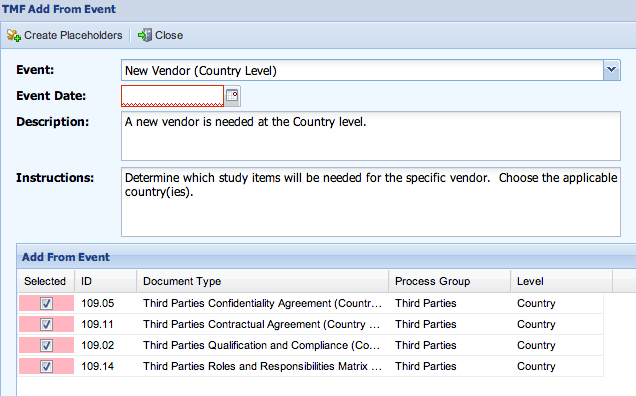
- Enter an Event Date.
This will be used with an offset to calculate a Due Date for the items that are added. - Review the items that are listed. Remove any placeholders that do not need to be created by unchecking the ‘Selected’ checkbox.
- When the correct set of items are selected/deselected based upon the event and the study, click Create Placeholders.
- If the event being added creates s at the Site or Country level, the Country/Site selection screen will allow you to specify which Countries and Sites get the new placeholders created by your event.
Events can add placeholders to Ongoing sites as well as to the template for new sites.
If you select any of the “All New Sites” options here, then all new sites created in that selection will include the Placeholders created by this event.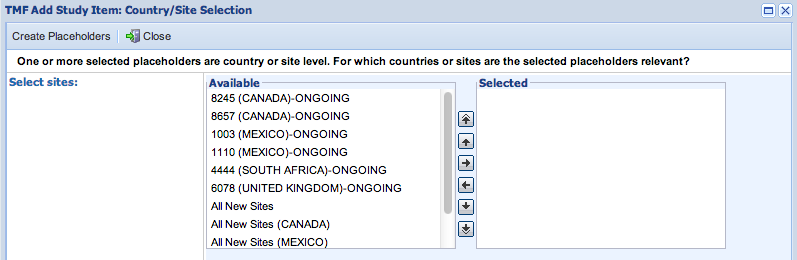
- The “Add From Event” screen allows you to duplicate any placeholders in your event if necessary.
Site Setup
The Site Wizard lets a Study Owner create a new Site for a study in eTMF.
The list of sites available for creation is based upon the list of sites the system has received through the CTMS Data Feed. Starting the wizard for a Site creates the Site in a Draft state. The site remains in a Draft state until the wizard is finished successfully.
A Wizard can be saved and resumed as many times as necessary until it is finished.
To begin the eTMF Site Wizard
- Navigate to the study home page for which the site is being created.
- In the Metadata grid, select the Country tab.
- Select the Actions menu for the Site you wish to activate and select ‘Activate Site in eTMF’.
- The first page of the Site Wizard is shown below.
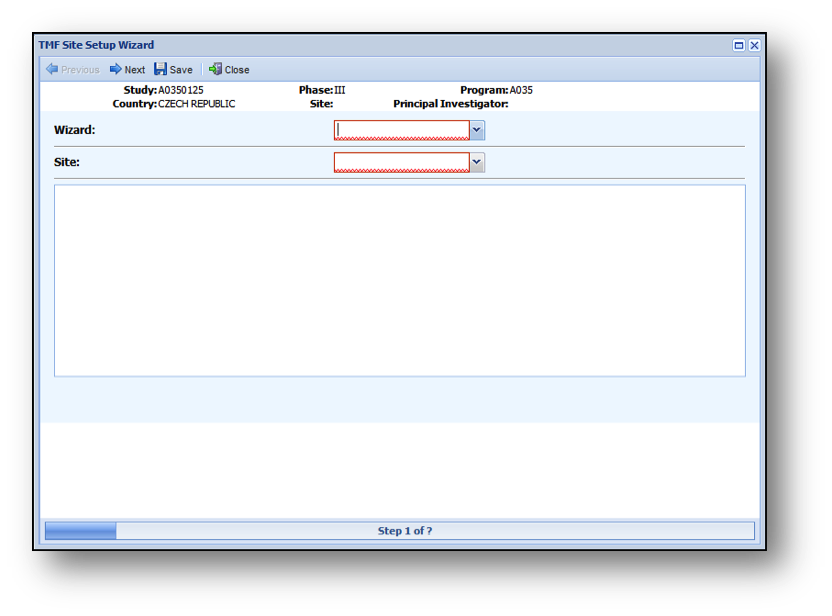
Once on the Site Wizard Window:
- Select a Site Wizard.
- Select the Site you are creating for this Study/Country.
- After selecting the Site, the bottom of the screen will refresh with data associated with the Site from the CTMS Data Feed.
This data can be used to verify that the correct site was selected.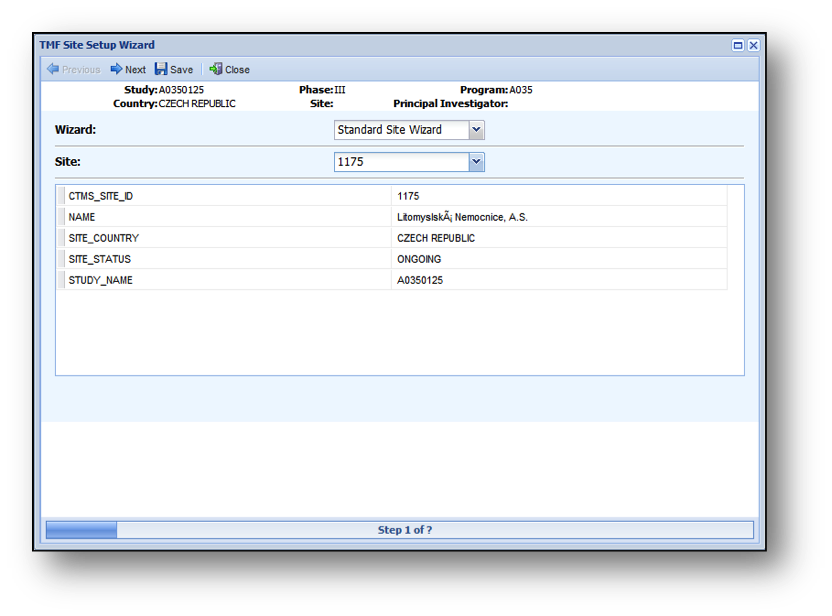
- Click Next or Save.
Clicking the Next button will take you to the next step in the wizard.
Clicking the Save button will save the data you have completed and exit the Wizard.
Site Wizard Steps
The following are the steps in the Site Wizard:
- Site Milestones
- Site Template
- Questions
- Site Vendors
- Add Additional Items
Each step in the Site Wizard works like the steps in the Study Wizard or Country Wizard.
Reviewing and Updating Site Milestones
The Site Milestones step is similar to the Study Milestones step during the Study Wizard except the milestones listed are the Site Level Milestones.
Reviewing the Site Template
The Site Template step is similar to the Country Template step during the Country Wizard, except the items listed are from the Site Template associated with the Study or Study and Country.
Answering Questions
The Questions step is similar to the Questions steps during the Study Wizard, except with site-specific questions.
Specifying Site Vendors
The Site Vendors step is identical to the Study Vendors step during the Study Wizard, except the vendor types and associated items are different.
Adding Additional Items
The Add Additional Items step is identical to the Add Additional Items step during the Study Wizard, except the items are only at the Site level.
Options When Finalizing the Wizard
- Finish – completes the wizard and generates the resulting site items associated with the site. The site is made Effective and is available for navigation within the application.
- Finish/New – performs all the functions associated with Finish but then launches the first page of the wizard to select another Site and allows you to immediately finish the wizard with the same answers/selections.
Country Setup
Setup Overview
Study Owners can create new countries in the eTMF with the Country Wizard.
CTMS data defines which countries can be created.
Starting the wizard for a Country creates the Country in a Draft state, where no documents can be added until the Country is activated.
The country remains in a Draft state until the wizard is finished successfully.
A Wizard can be saved and resumed multiple times as necessary.
Running the Country Wizard
From the Actions Menu on a Study’s home page, select Activate Country in eTMF.
The Country Wizard includes the following steps:
- Country Template
- Questions
- Principal Investigator Placeholders
- Sub Investigator Placeholders
- Country Vendors
- Add Additional Items
- Final Review
Country Template
The Country Template step allows you to see the list of documents that you get for this country based upon the execution of the Study Wizard. This step allows you to select the Functional Line or specify document-type specific Additional Attributes for each item, if applicable.
- Review the list of documents to be aware of the list of country items you will automatically get in your TMF.
- For any items that are listed, you can change/select the preset Functional Line and Additional Attributes as necessary.
Answering Questions
The Questions steps are like the Questions steps during the Study Wizard, except with country-specific questions.
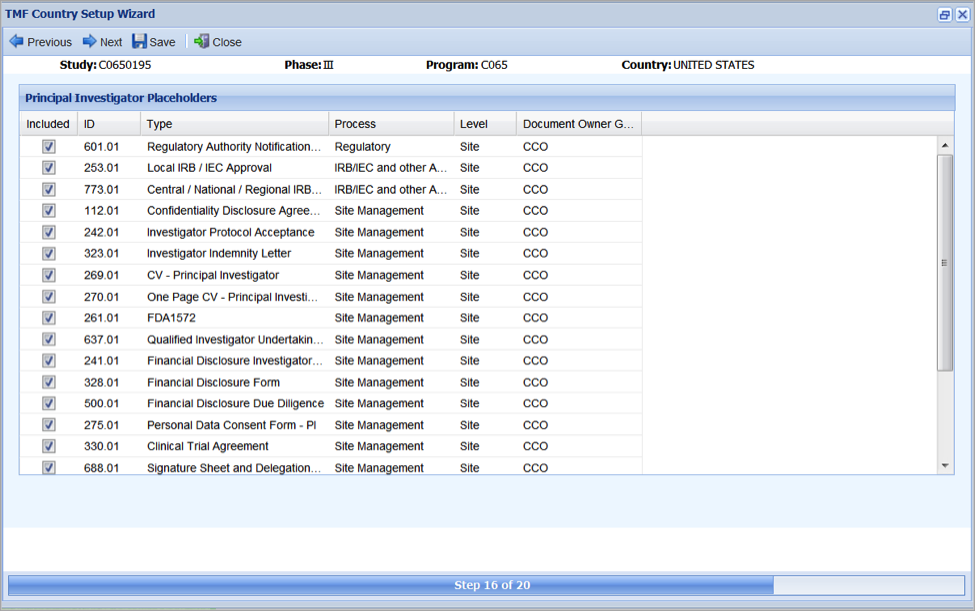
Setting Up Principal Investigator Placeholders
The Principal Investigator Placeholders step allows you to define the Master Items that are associated with each new principal investigator for which there is information about from the CTMS Data Feed. Any items selected in this step will be created for each new principal investigator for sites associated with this country.
- Review the list of possible items for a new principal investigator to see if they apply for this country.
- Deselect any of the items that you do not want to include in this study for new principal investigators.
- For any items that are still selected, select Functional Line as necessary.
Setting Up Sub Investigator Placeholders
The Sub Investigator Placeholders step allows you to define the Master Items that are associated with each new sub investigator for which there is information about from the CTMS Data Feed. Any items selected in this step will be created for each new sub investigator for sites associated with this country.
- Review the list of possible items for a new sub investigator to see if they apply for this country.
- Deselect any of the items that you do not want to include in this study for new sub investigators.
- For any items that are still selected, select Functional Line as necessary.
Country Vendors
This step allows you to define vendors that will be used at the country level for this study. Defining a vendor (and its associated vendor type) will determine a list of master items needed for that vendor. If you have no vendors at the Country level, you can simply move to the next step.
How to Add Country Vendors
- Click on Add Country Vendor.
- Select a Vendor from the list of vendors within the TMF application.
- Select a Vendor Type from the list of Vendor Types defined within the TMF application. Selecting a Vendor Type will display the list of master items that are associated to that vendor type.
- Deselect any of the items that you do not want to include in your TMF for this vendor.
- For any items that are still selected, select Functional Line as necessary.
- When the items for this vendor are complete, click Save. The vendor will be added to the Country Vendors screen.
Add Additional Items
This step allows you to select other master items that are associated with a milestone, but are not associated with any questions, vendor types, new subjects, new primary investigators, or new sub investigators. You have the ability to add any of these other items as necessary for the study.
- Review the list of items presented to see if they apply for this study.
- Select any of the items that you want to include in this study.
- For any items that are selected, select Functional Line and complete Additional Attributes as necessary – see Core Items step above for description of these steps.
Final Review
The Final Review step is similar to the Final Review step during the Study Wizard, except the tabs are appropriate for the sections executed in the Country Wizard.
Quality Control
| Key Quality Control Topics | |
| Quality Control Functions | |
Reset Password
To reset your eTMF password:
- Click on your name in the top-right corner.
- From the Actions menu, select Change Password…
- Enter your current password.
- Enter your new password.
- Confirm your new password by entering the same text in the Confirm New Password field.
- Click Save.
Note: You cannot re-use old passwords.
Signing Out
Use the Sign Out function to exit the eTMF when you are done using it.
- Click on your name in the top right corner.
- From the Actions menu, select Sign Out.
Note: You will be signed out automatically after a period of inactivity.
Minimum System Requirements
To use the eTMF, you will need:
- Either Internet Explorer version 10 or 11 or Google Chrome
- Browser cookies enabled
- a PDF Reader
The eTMF is best viewed at a resolution of 1360×768 or higher, although it is designed to work well at a wide range of display sizes.
Mark as Unfulfilled
To mark a Study Item as unfulfilled, choose study item that has been fulfilled with content, open it’s associated Actions Menu and select the Mark as Unfulfilled option.

This will open the Mark as Unfulfilled component window.
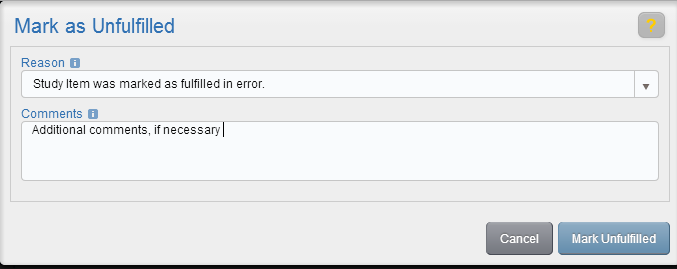
Choose a reason from the Reason dropdown, enter additional comments if necessary, and select Mark Unfulfilled.
The Study Item will now appear as unfulfilled. The change to the study item will be recorded in the Audit Trail.
Potential Duplicate Document
The Potential duplicate document screen alerts the user that a document with that metadata already exists in the system. The Duplicate Document screen will allow the user to view the content of the other document so that they can decide how to proceed.
