Tag Archives: 2.4

Announcement and Note Editor

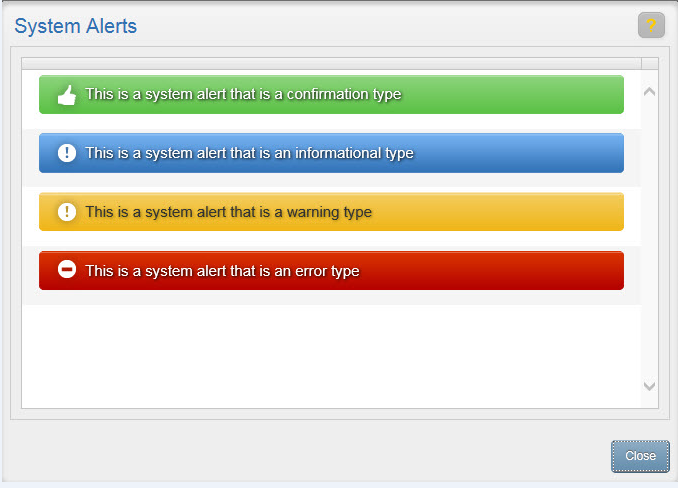
Add a New Announcement

Users with appropriate permissions can create a message that appears in the Announcements area for all users with access to the page. On the User Home page, Business Administrators can create announcements; on a Study Home page, Business Administrators and Study Owners can create announcements.

  1. Click the “+” next to Announcements. The Add an Announcement screen will display.
  2. Enter the text of your Announcement in the box, up to 2000 characters.
  3. Click Save. If you’ve created a study announcement, the Study Identifier will appear underneath the announcement text.

You can edit an announcement you’ve created. To access the Edit screen, select the announcement text and click the pencil icon.

To delete an announcement you’ve created, select the announcement text and click the trash can icon. On the Confirmation message, click OK. The announcement will no longer show to any user.

To dismiss an announcement so that it no longer appears in your announcements area, select the announcement text and click the x icon.

Add a New Note

Notes can be created by any user on the User Home page, a Study Home page, or within the metadata of a study item. Notes are displayed only to the user who created them and can be used to show reminders or other personal notations.

Notes created on the User Home page will only be displayed on the User Home page. Notes created on a Study’s Home page will display on that Study’s Home page and on the User Home page. Notes created for a specific study item will be displayed in the Workspace Panel for that study item, on the related Study Home page, and on the User Home page.

Home Page Notes

To create a note on the User Home page or Study Home page:

  1. Click the “+” next to My Notes. The Add a Note screen will be shown.
  2. Enter the text of your note in the box, up to 2000 characters.
  3. Click Save. If you’ve created a study note, the Study Identifier will appear underneath the note text.

To edit note text, select the text and click the pencil icon. Make the desired changes and click Save. To delete a note, select the text and click the trash can icon. On the Confirmation message, click OK.  Both actions will apply the change to all areas in which the note appears.

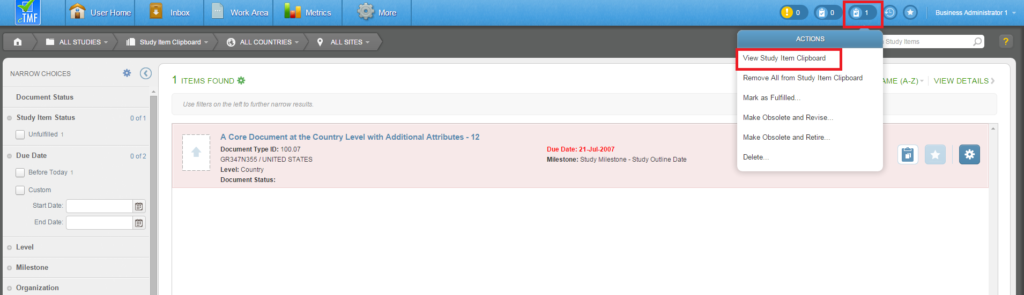
The Notes area on the User Home and Study Home pages provides an Actions menu from which you can do the following:

  • Remove all notes
  • Print notes

Document-Specific Notes

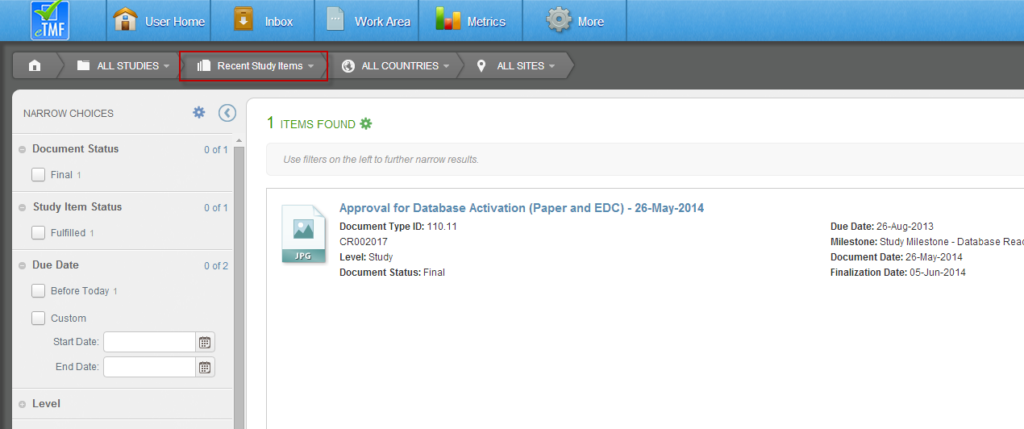
To add a document-specific note, open the Details view by clicking on the document name hyperlink within the study item list. In the Workspace Panel, expand the My Notes section and enter your note text. The text is automatically saved.Any notes entered will display on the Study Home page and User Home page with a link to the document.

Note: Neither system-wide nor study-specific announcements are treated as “TMF content”, so they are not included in exports or treated as official files.

Recent Study Items

Recent Study Items are those items that have had anything performed on them from their associated Action Menu, other than delete (e.g. Study Item activation, selection of View, selection of Acquire, Add to Clipboard).

These studies can be accessed by selecting the Recent Study Items icon in the Contextual Header of the eTMF as shown below.

Selecting this icon opens the Recent Study Items List view page.

To see the recent study items for a specific study, select the ALL STUDIES dropdown menu and select the study that you would like to see the recent items for.

Study Items will no longer be considered “Recent” 90 days after the last recorded study item access date.

Request Assistance

To ask for assistance with a document in your Work Area or a task in your Inbox, select the Ask option for the item. Select one or more reasons for why you are asking for assistance from the Reason(s) dropdown. You can remove a reason from the Reason(s) field by selecting the ‘X’ next to the reason.

Once you have selected one or more reasons you need to add comments to the comment field so that the Document Specialist who receives your request for assistance can better help you.

When the Document Specialist has responded to your request for assistance, their reply will show up in your Inbox.

Study Items Clipboard

The Study Items Clipboard is a space where Study Items can be gathered for easy access. To access the Study Items Clipboard, select the Study Items Clipboard button in the top right hand of any page and select View Study Items Clipboard.

To add a study item to the Study Items Clipboard, select the Add to Clipboard button (clipboard icon in image above) next to that study item. Once selected, an item may be removed from the Study Items Clipboard by selecting the Remove from Clipboard button on either the Study Items Clipboard page or the Study Items List page. To remove all items from the Study Items Clipboard, select the Study Items Clipboard button and select Remove All from Study Items Clipboard.

When items are added or removed from the Study Items clipboard the Study Items Clipboard button will update with the number of items on the clipboard.

QC Instructions

If QC instructions for the document type are available, they will be displayed when you click expand Instructions in the Workspace panel.

Finalize

If you have reviewed the content and metadata for the document and agree that it is accurate and complete, you may finalize the document by clicking the Finalize button in the Tasks tab.

  1. Choose the Finalize button.

2. The Document will become Effective and the Task will be removed from your inbox

If you do not agree with any of the content and metadata for the document, you should not Finalize the document and should choose either Fail, Correct, Delegate, or Return.

Top Bar

The top bar, shown below, provides instant access to the most commonly used eTMF screens.
The top bar is available on nearly every screen in the eTMF.

The Top Bar

Top Bar Buttons

  • User Home – Your personal eTMF front page
  • Inbox – List of your eTMF workflow tasks
  • Work Area – Streamlined task processing screen
  • Metrics – eTMF Reports and statistics (not available for all users)
  • More – Various functions such as advanced search, view master list, or administration (some functions are not available for all users)

Generating Expected Documents and Transmittals

Single Document Received and Study Item Exists

Use this method to create expected documents one at a time for Study Items that already exist:

  1. Locate the study item
  2. Choose create Expected Document (shown below)
  3. Expected Document will be created and present in your Work Area
  4. Navigate to your Work Area
  5. Finish Indexing and generate transmittal

Single Document Expected and Study Item Exists

Use this method to create a single expected document if a matching Study Item already exists and you expect to receive and scan the document, but you don’t yet have the document:

  1. Locate the study item
  2. Choose Generate Transmittal
  3. A Transmittal (cover sheet) will open for you to print
  4. Expected Document will be created in your Work Area – no more action needed now
  5. When the document is received, scan it in with the transmittal printed in step 3.

Create Multiple Expected Documents When Matching Study Items Exist

If study items already exist for multiple expected or received documents then:

  1. Locate the study items and add to the Clipboard
  2. From the Clipboard, choose Generate Expected Document.
  3. Create Expected/Generate Transmittals dialog will display
    Note: Up to 50 Study Items can be processed at once.
  4. From the “Create Expected / Generate Transmittals” screen, shown below,
    choose “I have received…” if you have the documents.
    choose “I plan to receive…” if you do not have the documents.

Expected and Received Documents Without Matching Study Items

If you have or expect documents, but matching Study Items do not exist, you will need to create Expected Documents and index to proposed Study Items.
To begin, use the Create Expected Docs button in Work Area List or Details view, shown below.

The “Create Expected Documents” screen, shown below, will allow you to create up to 100 Expected Documents at a time.
Be sure not to use this function when Study Items do not exist as considerably more indexing is needed.


Enter the number of documents you want to create and optionally, study, country, site
Click Add Documents.

Create Expected Documents in Bulk

  1. You can mix and match studies, countries and sites
  2. Each Expected Document is given a temporary name (“Expected Document – 1”) – change to a more meaningful value if desired
  3. Click Create Documents when done
  4. Expected Documents will be created in your Work Area, where you can complete desired indexing and generate Transmittals.
image_pdf