Contents
- 1 What Do Saved Filters Do?
- 2 When Do Saved Filters Help?
- 3 Who Can Save Filters?
- 4 Working with Saved Filters
- 4.1 Save a New Filter
- 4.2 Apply an Existing Saved Filter
- 4.3 Save Changes to an Existing Saved Filter
- 4.4 Share an Existing Filter with a New User or Group
- 4.5 Apply a Shared Filter
- 4.6 Revoke User Access to a Shared Filter
- 4.7 Remove a Shared Filter from Your List of Shared Filters
- 4.8 Delete a Saved Filter
What Do Saved Filters Do?
Saved filters store combinations of filter values so that you can rapidly apply them in the future without having to manually re-select the values from the Narrow Choices panel.
Saved filters do not include the Study, Country and Site context applied with the breadcrumb trail. As a result, you can create a saved filter in one Study-Country-Site context, then apply it in another context.
When Do Saved Filters Help?
Saved filters can save you time if there are complex sets of filter criteria you need to apply repeatedly.
For example, if you need to monitor incoming Investigator CV documents from three specific investigators, you could apply a Document Type filter for “Investigator CV” documents, a Site Personnel Name filter for the three investigators by name and a Document Status filter of “InQC”, then save your filter combination so that you can automatically apply the filter combination again with a single click.
Who Can Save Filters?
Any eTMF user can make filters and save them for their own use.
Users who are members of the “TMF Share Saved Filter” group are able to share their saved filters with others.
Working with Saved Filters
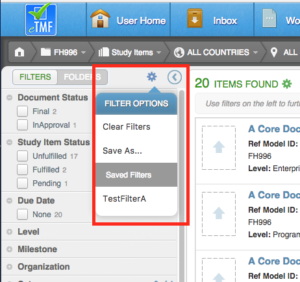
All of the controls for working with Saved Filters begin with the Filter Actions menu icon in the Filters panel, shown with the Filters Options list below.

Save a New Filter
- Set the filter criteria you want to save.
- Click the Actions menu icon at the top of the Narrow Choices panel and select “Save As” from the menu.
- Provide a name for the saved filter.
- (Optional) If you have permissions needed to share saved filters, enter the name of one or more users with whom you want to share the filter in the User(s) field.
- (Optional) In the Groups field, enter the group(s) to share the filter with.
- Click Save.
Apply an Existing Saved Filter
Apply a saved filter from the Actions menu in the Narrow Choices panel. Filters that you have created yourself will be shown under the Saved Filters heading.
The Saved Filters that are available to you are only those that apply to the type of list you are accessing. For example, filters saved on the study item list are available on the study item list, study item clipboard, recents, or favorites views. Filters saved in the Inbox are available only in the Inbox and on the task clipboard.
Save Changes to an Existing Saved Filter
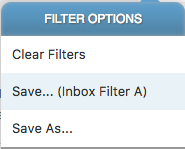
When a saved filter is applied to a list, you can make changes to the filter and save it by selecting “Save” from the Actions menu in the Narrow Choices panel and clicking Save on the Save Filters dialog. Saving will overwrite the existing filter definition with the currently applied filter set.
If you have the appropriate permissions, you can share a new filter you are saving with another user. You can also share a filter you’ve previously saved with other users by following the steps below.
- Click the filters action menu icon in the Narrow Choices panel, and click Save As.
- Enter the name of a user you want to share the filter with in the Users field. Repeat to add additional users.
- In the Groups field, enter the groups to share the filter with.
- Click Save.
Any active user can be the recipient of a shared filter, although some users may not be able to use some shared filters.
For example, a Work Area filter can be shared with a user in a TMF Reader Role who does not have a Work Area. However, the TMF Reader will not see a Work Area filter shared with them because they do not have access to the Work Area.
Apply a shared filter from the Actions menu in the Narrow Choices panel. Filters that others have created and shared with you will be shown under the Shared Filters heading.
To stop sharing a saved filter with another user:
- Apply the filter to be shared.
- Click the Filters actions menu icon and select “Save.”
- On the Save Filter dialog, click the “x” button at the right edge of the row for the user to be removed.
- Click Save.
- Confirm when prompted to overwrite the existing saved filter.
If you no longer want to use a filter that has been shared with you, click on the Actions menu icon in the Narrow Choices panel, hover over the Shared Filter name in the menu, and click the “x” on the row for that filter. This removes the filter from your list of Shared Filters but does not delete the filter from the system (only the user who created the filter can delete it).
Delete a Saved Filter
To remove a filter from your Saved Filters, click on the Actions menu icon in the Narrow Choices panel, hover over the Saved Filter name in the menu, and click the “x” on the row for that filter. The saved filter will be removed from the system and will also become unavailable to anyone you had shared it with.
Note: Users who have access to a shared filter through their membership in a group will not have the ability to remove the shared filter from their Shared Filters list. The filter will only be removed from a user’s list of Shared Filters if:
- The filter owner deletes the filter
- The filter owner modifies the filter to remove groups of which the user is a member
- The user is removed from a group with whom the filter was shared
